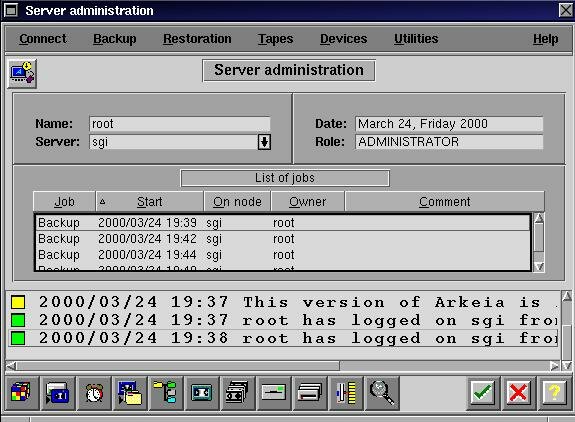
The main window
![[Photo of the Author]](../../common/images/Georges-Tarbouriech.jpg)
![[Illustration]](../../common/images/article149/arkeia.jpg)
What does it look like?
The main window
As we have seen before, Arkeia uses a GUI on the server side.
You need to log into Arkeia through a login window from where you have access to every task specific window backup management. These windows are opened from a tool-bar menu, contextual menu or from icons.
All this can be configured according to your taste (predefined backgrounds or color of your choice).
There is not much more to say as everything is obvious and user-friendly.
On Unix the GUI (graphical user interface) will work with most window managers.
On Microsoft things, you'll have to install THE Microsoft JVM (Java Virtual Machine) before using the GUI.
The GUI is quite practical whether you like its design or not.
How does it work?
Arkeia uses a parallel backup technology through a TCP/IP network.
A backup server manages the tape drives and gets the data from the clients using multi-flow.
It operates according to client/server standards using shared memory and message queues. IPC (Inter Process Communication) has to be perfectly configured on your backup server.
The user manual will teach you how to tune your backup server.
The configuration is quite logical: you need to install client software together with server software on the backup server and client software on the clients. So far, so good!
On the server side you'll have to define everything concerning tape drives, drivepacks, tape pools, tapes and savepacks.
- Tape drives: the first step of the configuring process.
Select "Drives management" from the "Devices" menu. You have to define a name for the drive, its authorizations (Read, write, clean, delete) and of course its device. This will depend on your system: for example /dev/rmt/1h on Solaris or /dev/rmt/tps1d2 on Irix or /dev/st0 on Linux.
You must define each drive and the corresponding device.
Let's say you have four QIC tape drives attached to your SGI O2 server (Irix 6.5):
The first one could be called QICone with /dev/rmt/tps1d2 as the device, the second one QICtwo with /dev/rmt/tps1d3 as the device, and so on.
The figure "1" after "tps" is the SCSI controller number and the figure "2" after "d" is the device ID.
You have to know how SCSI works. IDs, daisy chains etc...
If you own a robot, the configuring process is almost identical and the documentation tells you everything you need.
- Drivepacks:
From the same menu item, select "Drivepacks" and create a drivepack corresponding to the tape drive.
In line with the previous example, I assume you have a QICone tape drive. You could call your drivepack QICone Pack. Do the same for each defined tape drive.
Now, each drivepack must match its tape drive. Selecting the tape drive and the corresponding drivepack will do the trick.
- Tape pool:
This step allows you to create as many pools as you need. From the "Tapes management" menu, select "Pools management". Click in the "New" icon and fill in the fields to create a pool.
- Tapes:
Each pool must contain one or more tapes. The "Tapes in pool" window can opened by double-clicking on the pool. If you select "New" you open the "Create tape" window. Just fill the fields.
By the way, there is a very useful online help, one per window telling you what to do.
- Savepacks:
Last but not least, you can now create one or more savepacks. Savepacks contain the tree you want to backup for a specific client. You can browse through the tree with a navigator to select directories or files.
Repeat the operation for each client and for each tree to backup.
Now, you are ready for an interactive backup of various clients at the same time.
We give them all the rights to set it up as we like: we are the administrator and we are working as root.
Awful, isn't it?
Next, we create the corresponding drivepacks: Sun Pack, Linux Pack, Pcsvr Pack and Pcdev Pack, again with a lot of imagination.
Now, the tapes pool: as usual, Sun Pool, Linux Pool, Pcsvr Pool and Pcdev Pool.
We create a pool for each pack. That's a personal choice. You could create only one pool with all four tapes.
If your pool contains many tapes, Arkeia manages the drives. That means, if you don't set a priority for each drive, Arkeia decides what to backup on which drive.
This is probably the feature I dislike the most.
Last, let's define a tape within each pool: and again, Sun Tape, Linux Tape, Pcsvr Tape and Pcdev tape.
Don't worry, this only has to be done once. You'll be able to use all that stuff every time you'll need it.
What we want is a full backup for each server.
Let's define the savepacks: Sun, Linux, Pcsvr and Pcdev will be the names.
Of course, Arkeia is properly installed on the clients so you can see every machine in the browser. Just select them by clicking in the corresponding check box.
Let's launch the interactive backup. Select the "Interactive backup" menu item. When the window is displayed, you select a savepack, a drivepack and a pool for each server.
In our example, to backup the Sun, the savepack to select is Sun, the drivepack is Sun Pack and the pool is Sun Pool. Choose the type of backup (total in this example, but you could have selected incremental), the tape strategy (use new tapes for this example, alternatively we could have said complete existing tapes) and use e-mail notification or not (it's up to you). Just click in the check box and the Sun backup starts.
Repeate this step for each server and that's all. Four backups are running at once and you can have a coffee.
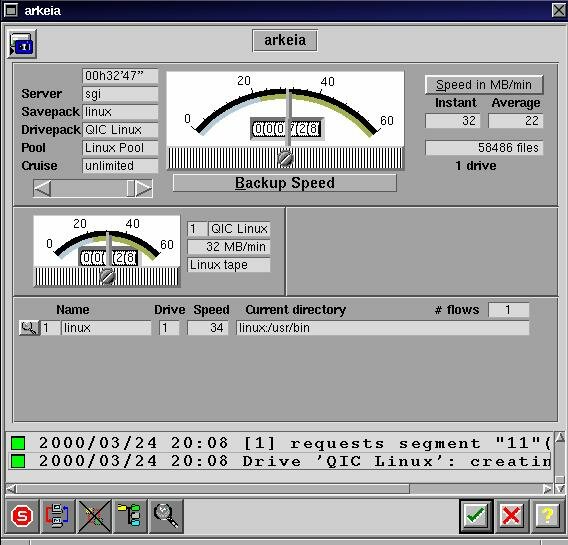
The backup window
About 40 minutes later it's all over.
Some important facts: our network is a category 5... but under construction! That means: not all the cabling is cat 5, hubs are either 10 or 10/100 Mbit, only some machines have real 100Mb network cards...
Nevertheless, we did backup about 3Gb and something like 150000 files in about 40 minutes.
On true cat 5 networks with 100Mbit, you could have done it about 3 times faster.
Speed depends on many factors: network, machines, tape drives, tape size. Our example is a specific case and doesn't reflect the fantastic speed you can get on some configuration. If your network is true cat 5, if you own robots, if you use DAT, if your machines are very fast... you can expect about 70 Mb/min. In our example, we get a mean of about 25Mb/min.
This is for each backup. Considering they are done altogether gives 100Mb/min.
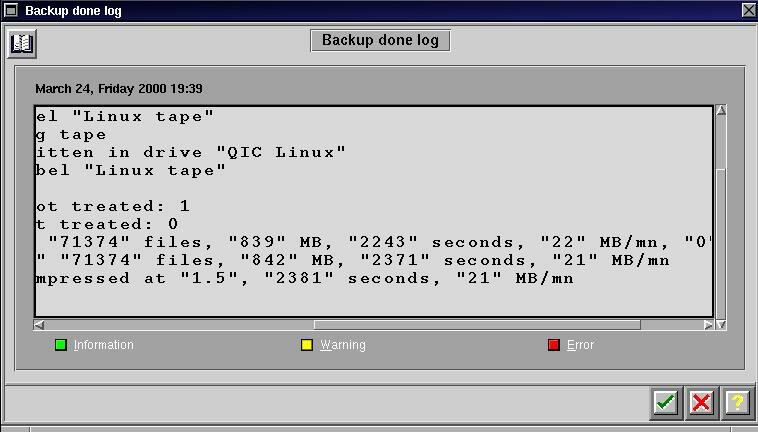

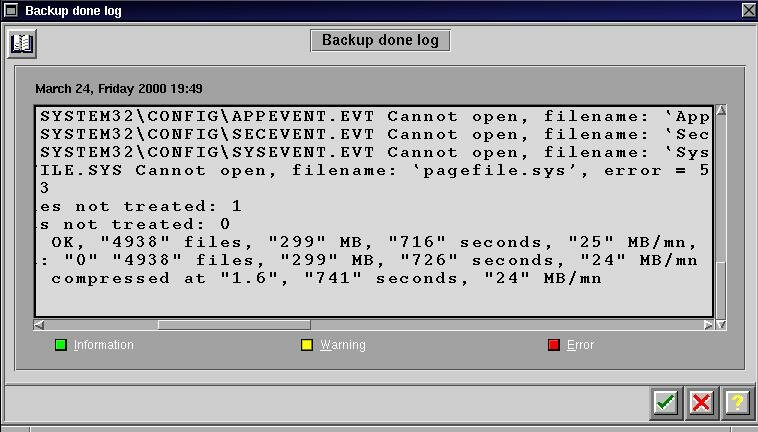
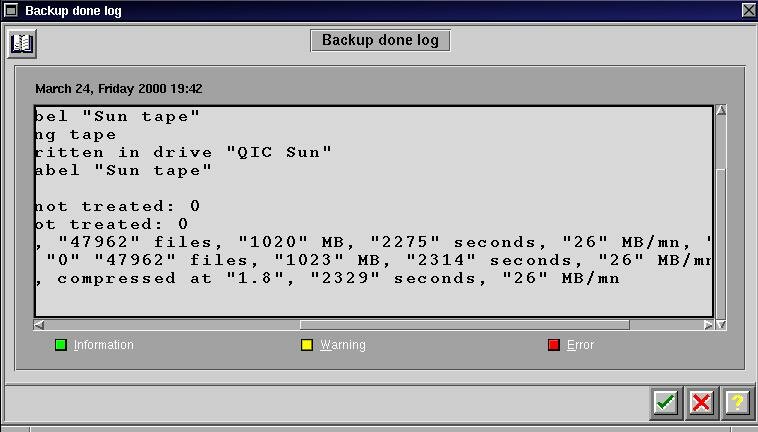
The logs
However, an interesting way to understand Arkeia efficiency is to compare these results to the old backup strategy on the same hardware.
Before using Arkeia, backups were done directly from each machine, every tape drive being connected to their SCSI port.
We still use the same machines and the same tape drives but we gained about 50% speed.
Sun backup time with its own tape drive: 1 hour; with Arkeia: 38 minutes. Pcdev backup time with its own tape drive: more than 1 hour; with Arkeia: 32 minutes. And so on...
Don't we forget to backup the backup server: that time we don't use the network, and of course it becomes a bit slower (about 22Mb/min).
This example concerns network servers. Obviously, you can do the same for your network clients.
According to Arkeia, with the right hardware you should be able to backup 128 machines on 32 devices in parallel.
I have not been able to test such a configuration. We are poor...where I work.
We can't talk about backup without mentioning restoration: It's as easy and fast as backup. Using the navigator you can restore exactly what you want and even where you want, that is, you can restore into some other directory or machine.
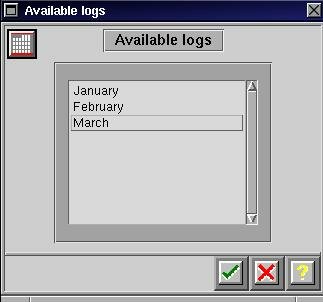
The available logs window
The online help deserves to be mentioned. You can work with Arkeia without reading the full documentation. Well, as soon as you don't want to go into advanced administration.
The full documentation is contained in the program CD-Rom in PDF format, allowing you to easily print it and to create your own manuals.
This doc contains very important information about platform specific configuration, security, troubleshooting, tools, robot libraries...
If you need more, there is a mailing list dedicated to Arkeia.
We're living a great time!