Sponsored by:

Our sponsors make financial contributions toward the costs of publishing Linux Gazette. If you would like to become a sponsor of LG, e-mail us at .
TWDT 1 (text)
TWDT 2 (HTML)
are files containing the entire issue: one in text format, one in HTML. They are provided strictly as a way to save the contents as one file for later printing in the format of your choice; there is no guarantee of working links in the HTML version.
Got any great ideas for improvements! Send your
This page written and maintained by the Editor of Linux Gazette,
Write the Gazette at
|
Contents: |

The last couple of months have been rather light on articles. It's been helpful to have the new chapters for Linux Installation and Getting Starting to include. So all you budding authors and Linux users out there, send me your stuff. Don't depend on our regular authors to fill the gap. We want to hear about all the neat tips and tricks you've found, as well as all the neat applications your are writing or working with. --Editor
 Date: Sat Apr 19 07:29:14 1997
Subject: Searching for Information On Newsgroups
From: Roman,
Hi folks!
I'm installing a very small news- and email system at my local university (peolpe there are studying arts, so there's no one to help me with this). I set up one computer with Linux 2.0.29 which is permanently connected to the 'internet' via ethernet. Then I want to connect a second PC which is installed in the hallway via nullmodem-cable for all the students to write and receive eMail. But the problem now is, that the provider (another part of the university) doesn't give us access to the newsgroups, so I want to set up at least some local newsgroups on this Linux-station.
But I just can't seem to find any documentation explaining how to set up local newsgroups. smtpd and nntpd are running, but the manpages won't tell anything about how to set up ng's (forgive me if I'm just too blind or stupid to find the obvious source of information).
So I don't want to bother you explaining me how to accomplish this task, but perhaps someone can at least tell me where to find the desired information.
Best regards, Roman.
Date: Thu Apr 24 11:44:40 1997
Subject: VGA_16 Server
From: Javier Viscain
Congratulations for the aim and contents of the Gazette. Here is an issue I've never seen addressed: the VGA_16 server maintains two monitors (the second monochrome with an Hercules card) but what only works is the mouse movement, which moves out of left and right to the other monitor, and console switching. No window on the monochrome gets focus. Things that moreless appear on the monochrome but don't work:
I think that the hardware absolute addressing is the normal VGA one (0A0000 to 0AFFFF) and 64K for the Hercules (0B0000 to 0BFFFF), which is correct. In adition, this server and the mono server are very buggy when with only the Hercules.
Any easy solution, or is it that this configuration has not been debugged?
TIA, Javier Vizcaino, Madrid, Spain.
Date: Sun 6 Apr 1997 11:54:42 -0400
Subject: Initilation Files
From Karl Easterly
As an article Idea, I think an overview of the major boot scripts would = be helpful. The overview could include an objective view of the = locations, functions, and nifty "tips and tricks" or such. Also, links = to how-toos for each script would future simplify the learning curve for = new users.
Another idea would be to do a chronological installations and = customization series of articles. Granted, hardware diversity might be = a problem and could possibly be subverted by starting the series as = though a working installation of Linux has already been installed. It = would proceed as a rough idea like this.
These are just stabs at a scheme, the actual order would have to be = hammered out before the series started, but in general, would be helpful = to have a step by step issue oriented series of articles concerning the = setup and customization of any linux installation.
Date: Sat, 1 Mar 1997 15:39:10 -0500
Subject: Ideas for Beginners
From: stephen jarvis
Hello
I am 'the' absolute beginner.I have had a copy of Linux Slackware and a copy of "Linux configuration and installation " by P Volkerding et al for about two weeks.Prior to this I had dabbled at dos and wondered(?) at windows.But when I heard about Linux in a magazine it occured to me that it might be fun to have a go.And indeed it has been.
The only problem I have had is with regard to the man pages. In general they are technical to a degree that while appropriate for those who can follow the argument from end to end,are pretty debilitating for the newbie like me.Indeed I don't always get to the end.
Perseverence will no doubt pay off and I have expanded my collection of books already,to take advantage of the possibility of learning something about programming on Linux.But then I have always had the kind of curiousity that,while not enough to kill the cat,is enough to keep me in the book shop.The point I think is that the man pages themselves are a bit of a barrier to the wider useage of Linux.
No doubt others would say the detail and technical clout of this source of information is needed for those who want to make serious use of Linux.But not everyone who wants to escape from the soporific influence of Microsoft is that demanding or that knowledgeable.I think someone needs to pitch things at the introductory level.In the realms of 'this will get it going'and 'try this out'.Merely a more chatty approach would help remove the shiney armour of incomprehensibilty some pages deploy.
If this sounds a little unfair to the many people who have compiled ,man pages it is most definitley not meant to be.There is a need for accurate and complete information especially as Linux is a cooperative venture and everyone needs to have a common root of information.The question is how can the benefits of Linux be made widely known to people outside the existing network.What will grab their attention and take the gleam off Windows 95?Something more open to a wider audience perhaps.
This does not have to be completely bland and overly simple just in the range of every day usage.An approach that does not assume that everyone reading knows the meaning of every term on the page.People need an introduction to the language of Linux in the way that you might learn French or English.Start with very basic things and build up in stages.Don't launch straight into 'How To Compile Your Kernal '.Ok thats important ,but I am sure most people still think a kernal is what you find inside a nut.I hope you are getting the general idea.
What us new people need is probably a collection of basic texts each about the length of a several page magazine article.Hopefully they would cover the things that a hardend Linux user would be embarrassed to ask about.'The kernal for beginners'.'Great now I can ask what it really is'.If this undertaking was started then I am sure that the end product of a few months could be published as a small book.Maybe you could publish it.I think there is a potential market.Many magazines recently covered the subject of Linux.That's how I got the bug.
Now it's true there are books already that cover Linux but there are not many on line man pages or magazine articles that give the beginner the feeling that they can actually get their system up and running easily.So if you really want to publish articles for absolute beginners bear in mind the kind of language that is used.
Regards Steve Jarvis
ps.. here's some ideas ' What is the kernal','The basic commands to get around bash','What are disk partitions and why bother',' To Umsdos or not. That's the question','Midnight Commander-an introduction','This is the easiest editor anybody ever used(insert your choice)','A glossary of general terms you'll find on a man page','These books are a good read(assorted titles)'.'How to get around an info text with less than 20 pages of instructions','Why the idea of a free and open o/s matters','X is not a horror film'.
Maybe these are a bit daft but they'd get my attention.They are the sort of things I'd like to know about.
Date: 04 Apr 97 19:02:21 EST
Subject: Technical Support
From: Dani Fricker
first i wanna say thanx for the lj! great work and fun not even for linuxers! i need your help. for some reasons i have to identify a user on my webserver by his/her ip-address. fact is that users logon comes from different physical machines. that means that i have to assign something like a virtual ip-address to a users log name. something like a reversal masquerading. my ip-gateway connects my inner lan over two token ring network cards (sorry, not my idea!) with the internet (lan <-> tr0 <-> tr1 <-> internet). the masquerading forward roule of ipfwadm gives me the possibility to indicate a source and a destination address. do you see a possibility for an 'address assignment' between the two interfaces? if you do please let me know.
dani fricker
programmer
zurich-switzerland
Date: Mon, 07 Apr 1997 03:01:17 -0500
Subject:HELP with Man Pages From: "Mauricio Naranjo N."
Well, I have installed the linux toolkit / october 1996 and I have not been able to install the man pages for commonly used commands like cat, ls, and so on; instead I have installed the man pages for packages like, fvwm, midnight commander, ....
So, I installed man2.tgz, man3.tgz, manpgs.tgz, but I still have not been able to get installed the whole support for man; Can you tell me please, what's the matter???? Any kind of help would be great appreciated, and excuses for ignorance but I am new at this OS (finally I found a true one)
Mao
Date: Mon, 7 Apr 1997 15:43:21 -0400 (EDT)
Subject: Port Mouse
From: Jose,
Hi, Maybe you can help me with this. (I hope) I switched motherboards, from a zeos pentium 90 that used a serial mouse to a asus p/i-p55tvp4 motherboard that uses a port mouse. And now I can't get x-windows to run. Any ideas?
Date: Tue, 01 Apr 1997 04:26:04 -0600
Subject: Linux
From: Tred Riggs
I am a college student attending Stephen F. Austin State University. I work in a Geographic Information Systems Laboratory (GIS) and we have been just using AIX machines. Howerver we do have a full blown linux pc and it is great. {Since then I stripped DOS off my PC and made me a full blown linux box, which works wonderful. We were considering to upgrade to all linux PC's in out lab because they were cheaper and faster than the AIX boxes, but we ran into a problem. The Software we need to run to make our GIS maps is not supported by ESRI, so we gave them a call. This is what they told us:
"Linux will not be a supported platform. They told me that product ports are user driven and there is not enough users wanting this OS."
I could not figure out how they could even say this when all you have to do is get on the web and see millions of people using linux. So here is what I want to happen. I need linux users to E-mail ESRI at buspartners@esri.com and tell them that you use linux and that there are many more people using linux too. ESRI needs to get there head out of Microsofts world and see what is going on in the real world.
Thanks for your time Linux Gazette,
Tred Riggs
Date: Thu, 3 Apr 97 22:40:23 BST
Subject:http://www.ssc.com/lg/index.html
From: Duncan Simpson
Given Micro$oft's tag line of "Yet another Web server powered by NT" maybe we should collect a list of people doing this sort of stuff on Linux. I can add 3 items myself http://mail.telstar.net is powered by Linux The telstar mail service described there is also powered by the same linux box Astra has switch from NT to Linux for its radius server. (NT was just too expensive and no better than Linux (Un*x)---the price diffrernece was *1000s* of pounds, each about 1.5 $ US). Both astra (and telstar.net) DNS servers are linux.
If the stats show that Linux is more popular for comercial web servers than NT, this would be something nice to be able to point out...
Duncan (-:
P.S. Any bets when Truetype fonts can be used for proper typesetiing. At present they lack litagures (fl and various other items that are tradionally rendered as single characters)?
P.P.S. The use of the present tense (switch) is apt because the change is happening now. (Despite a bug that is now not being exercised due to an attempt to eradicate it mail.telstar.net is more reliable than any of various NT machines at handling mail).
Date: Fri, 04 Apr 1997 15:57:12 -0600
Subject: Re: How to ftp Back Home
From: James Stansell
The ifconfig command works, and may be the most authoritative on the subject (except I believe the PPP log also contains your current IP), but the ifconfig command returns a ton more information than I want.
So I ask my machine at work who I am:
who am i
stansell   ttyp6   Apr 4 15:51   (206.125.79.118)
I've inserted your example IP address where my actual address showed up. If the DNS at work does happen to know a name for my address, then it shows up instead of the IP.
--james
Date: Thu, 10 Apr 1997 17:08:38 -0500
Subject: Re:GV article
From: Larry Ayers
To: Geoffrey Leach
Sorry the URL didn't work for you; I recently got an email message from Helmut Geyer, the maintainer of the Debian GV version and he included a URL for a new GV home-page: http://wwwthep.physik.uni-mainz.de/~plass/gv/
The Debian version is in the /text section of the /i386 binary directory of any Debian mirror. Shouldn't be too hard to find.
Good luck!
Larry Ayers
![[ TABLE OF CONTENTS ]](../gx/indexnew.gif)
![[ FRONT PAGE ]](../gx/homenew.gif)

 More 2¢ Tips!
 X Limitation to 8 Bit Color
From: Gary Masters
I read your question in Linux Gazette regarding an X limitation to 8 bit color when the system has more than 14 megs of RAM. Where did you find that information? I ask because my system has 24 megs of RAM, and I run 16 bit color all the time. One difference between our systems is that I am using a Diamond Stealth 64 video card.
The place I tell X to run in 16 bit mode is in the file /usr/X11R6/bin/startx. There is a line in this file that begins with serverargs. I get 16 bit mode by giving "-bpp 16" as an argument in this line (e.g. serverargs="-bpp 16").
One problem I did have was that the OpenLook Window Manager (olwm) did not like 16 bpp mode. I solved this by switching to the OpenLook Virtual Window Manager (olvwm)[1]. I also had success using the Tab and FV Window Managers (twm & fvwm) in 16 bpp mode.
Coming from a SunOS background, I'm used to OpenLook.
Gary Masters
Screen Blanking Under XFrom: Gary Masters
I read your question in the Linux Gazette regarding unwanted screen blanking under X after upgrading to a newer distribution of Linux. I had the same frustration. Apparently the X servers included in the Xfree86 version distributed with current Linux distributions has screen blanking compiled as a default behavior.
This behavior can be controlled with the -s option to the server. Look in the startx script for a line that begins with serverargs and add "-s 0". This will disable the X screen blank.
Gary Masters
Doubleclick Internet User ProfilesFrom: Kragen Javier Sittler
Check out the description of what doubleclick.net does at http://www.doubleclick.net/frames/adinfo/dartset.htm
Then decide whether you want to be added to their database of Internet user profiles. If not, you can use the script below; I run it in my
/etc/rc.d/rc.inet1. It prevents any DoubleClick banners from being displayed, prevents any cookies from being set, and prevents DoubleClick from collecting any data on you.
It also does the same thing with linkexchange.com, because I find their constant banners and requests for cookies annoying. If you'd prefer, you can take out the linkexchange lines.
However, this will also keep you from receiving *any* information from doubleclick or linkexchange directly... so you can't visit their web sites either.
On my machine, I put the script in
/etc/rc.d/rc.doubleclickand run it from
/etc/rc.d/rc.inet1at boot time, so I'm always protected from DoubleClick.
# Script begins below:

#!/bin/sh
# By Kragen Sitaker, 21 April 1997.

# Prevent any packets from reaching doubleclick.net
/sbin/route add -net 199.95.207.0 netmask 255.255.255.0 lo
/sbin/route add -net 199.95.208.0 netmask 255.255.255.0 lo

# And ad.linkexchange.com too!
/sbin/route add -net 204.71.189.0 netmask 255.255.255.0 lo
How to Mount/Unmount For UsersFrom: Kidong Lee
When I mount/umount file, I have to login as root. It's not convenient for me & other users. but, I found the solution that user who is not root can do mount/umount in mount man page.
Take a look at /etc/fstab.
#

/dev/hdb      /cdrom         iso9660          ro,user   0      0
Note "user" in options field. In options field, if you add "user", users can do mount/umount.
File Transfer With the z ProtocolFrom: Gregor Gerstmann,
Regarding Linux Gazette issue16, April 1997, I have some remarks regarding the article on file transfer with the z protocol: 'I type sz things go along fine, until about 40K then I get a couple of different error messages....' We have an internal modem with a transfer rate of 2880 cps on the telephone line. My son has an account at a Berlin university with a limited capacity of 5MB. We found the same error but not limited to a special file size! During the night hours, between 1 and 5h local time, when telephone costs are lowest, we sometimes transfered files up to 100KB without errors! To avoid any errors at all, I limited the packages to 20 * 1024 = 20480 bytes, if a CRC occurs, transfer begins once more but with- out timeout error, because the parcels are small. I use two proce- dures: the first, Chop, generates another procedure that chops the file to be transfered with the help of dd into packages and regu- lates the transfer and removing of transfered packages. At home we concatenate the packages again with cat ... ... > ... and everything is ok. The last step could be done by a procedure too. Of course, it is rather simple software, but it works until we will use ISDN.
first parameter - number of bytes
second          - begin of output names, e.g. p1
third           - name of file to be chopped
#!/bin/bash
echo "* Begin of procedure Chop *"
date
# rm alte Datei
if test -e /usr/TFH/EXAMPLE
        then rm /usr/TFH/EXAMPLE
fi
# Test auf Parameter
if test $# -lt 3
        then echo "Incorrect number of parameters !
Please repeat procedure call !"
echo "* End of procedure Chop (error) *"
        exit 1
        else echo "Call was ok"
fi
#
BY=$1
ANZZ=$[(($BY / 20480) + 1)]
quantity=$ANZZ
i=1
recs=0
while test "$i" -lt "$quantity"
do
echo dd if=$3 of=$2_$i bs=1024 skip=$recs count=20 >> /usr/TFH/EXAMPLE
echo sz $2_$i >> /usr/TFH/EXAMPLE
echo rm $2_$i >> /usr/TFH/EXAMPLE
        i="`expr $i + 1`"
        recs="`expr $recs + 20`"
done
echo dd if=$3 of=$2_$i bs=1024 skip=$recs >> /usr/TFH/EXAMPLE
echo sz $2_$i >> /usr/TFH/EXAMPLE
echo rm $2_$i >> /usr/TFH/EXAMPLE
#
echo "* End of procedure Chop (ok) *"
#
Using ftp Commands in ShellscriptFrom: Walter Harms,
Using FTP as a shell-command with ftplib
Working on several different networks means that you always need to copy your data from net to net. Most ppl use rcp but like most SysOps I found this to be a terrible security hole. So as I started this job my first business was to rewrite several scripts that were using rsh,rcp etc. I replaced them with an ftp based script ftp - <input> out 2> out.err. It's easy to see that this was not a good idea because ftp was not intended as shell-commando like cp,mv and the other guys. So I was happy to find the ftplib on a linux-CD. It's a nice lib that I used to build cmds like ftpmv, ftpcp, ftprm.. This made my scripts much slimmer and simpler. I have some terrible copy-scripts running but no problems copying on different systems like Ultrix or AIX.
Example using ftpget (from the ftplib Author Thomas Pfau)
ftpget sunsite.unc.edu -r /pub/Linux ls-lR.gzThis command reads the file
/pub/Linux/ls-lR.gz from sunsite.unc.eduLikewise there are other commands with the lib: ftpdir ,ftpsend, ftprm
Who needs ftplib?
Everybody tired of typing ftp... every evening to get the latest patches or whatever. Everyone who is regularly copying with ftp the same Datafiles.
Why use ftplib?
Of course you can add it to you own application but more experienced users don't have to use these r-commands anymore. An ftpd is available for the majority of systems so it is easier to access more of them.
Any drawbacks?
Of course, for any ftp session you need a user/paswdr. I copy into public area using anonymous/email@ others will need to surly a password at login, what is not very useful for regular jobs or you have to use some kind of public login but still I think it's easier and better to use than the r-cmds.
-- walter
ACSII-Artwork TranslatorHere is something interesting which you might consider for publication. It is a short program written in LEX and C, which takes ASCII-Artwork and translates it into HTML 3.0 compliant table data. It is a pretty interesting idea, and as far as I know, I'm the first person to try something like this, or automate the process. The translator (a2t) has a few options:
The program was completed just today, so it is very new. I've released it under the GNU license agreement.
For some examples of the output generated by a2t, see: http://wilkes.edu/~pkeane
I think you'll find the results to be pretty amusing, and slightly more interesting than the usual bag of HTML table-tricks.
Enjoy-- Patrick
%{

/* Ascii-to-Table version 2.0
**
** A conversion utility to convert gifscii type ASCII-Artwork into
** grayscale HTML 3.0 compliant html documents using tables.
**
** Copyright(C) 1997 by Patrick J.M. Keane --  All rights reserved.
** (pkeane@wilkes.edu)
**
** This program is free software; you can redistribute it and/or modify
** it under the terms of the GNU General Public License as published by
** the Free Software Foundation; either version 2 of the License, or
** (at your option) any later version.
**
** This program is distributed in the hope that it will be useful,
** but WITHOUT ANY WARRANTY; without even the implied warranty of
** MERCHANTABILITY or FITNESS FOR A PARTICULAR PURPOSE.  See the
** GNU General Public License for more details.
**
** You should have received a copy of the GNU General Public License
** along with this program; if not, write to the Free Software
** Foundation, Inc., 675 Mass Ave, Cambridge, MA 02139, USA.
**
*/

#include
#include
#include

char shade1[4], shade2[4], shade3[4] ;
int reverse=0, widthset=0, width=0 ;
int shade1set=0, shade2set=0, shade3set=0 ;

void maketd(const char *value) {
  printf("
") ; } main(int argc, char *argv[]) { int c; extern int optind; extern char *optarg; extern int opterr; while ((c = getopt(argc, argv, "w:r:g:b:xh")) != EOF) { switch (c) { case 'x': reverse = 1 ; break; case 'h': fprintf(stderr, "Usage:\n\tcat asciifile | a2t [-h] [-x] [-[rgb] value] [-w width] > document.html\n\n") ; fprintf(stderr, "\t-h : This help screen\n") ; fprintf(stderr, "\t-x : Reverse output\n") ; fprintf(stderr, "\t-r value : Constant R GB value\n") ; fprintf(stderr, "\t-g value : Constant G RB value\n") ; fprintf(stderr, "\t-b value : Constant B RG<B> value\n") ; fprintf(stderr, "\t-w value : Set width of output table\n") ; exit(0) ; break; case 'r': shade1set = 1 ; strcpy(shade1, optarg) ; break ; case 'g': shade2set = 1 ; strcpy(shade2, optarg) ; break ; case 'b': shade3set = 1 ; strcpy(shade3, optarg) ; break ; case 'w': widthset = 1 ; width = atoi(optarg) ; break ; default: fprintf(stderr, "Bad option: %c\n", c); exit(1) ; break; } } printf ("\n") ; printf ("\n") ; printf ("\n") ; printf ("\n") ; printf ("
Including Graphics in Linuxdoc SGMLFrom: Martin Michlmayr
Date: Thu, Apr 17, 1997 at 07:48:19PM +0200
You can already include PostScript images in Linuxdoc-SGML which will get included in TeX output (and consequently in DVI and PostScript). Linuxdoc-SGML doesn't support images for HTML, however.
An example:
| ", ((shade1set==0) ? value : shade1), ((shade2set==0) ? value : shade2), ((shade3set==0) ? value : shade3)) ; printf(" | ") ; printf(" |
 |
Contents: |
 I'm familiar with C-Kermit. In fact I may have an article in the June issue of SysAdmin magazine on that very topic.
The main points of my article are that C-Kermit is a telnet and rlogin client as well as a serial communications program -- and that it is a scripting language that's available on just about every platform around.
I know about Telix' support for the kermit transfer protocol. It sucks. On my main system I get about 1900 cps for ZMODEM transfers -- about 2200 for kermit FAST (between a copy of C-Kermit 5A(188) and 6.0.192 and about 70 cps (yes -- seventy!) between a copy of C-Kermit and Telix' internal kermit.
Other than that I've always liked Telix. Minicom has nice ncurses and color -- but is not nearly as featureful or stable as either Telix for DOS or any version of C-Kermit.
Your line hangups probably have to do with your settings for carrier-watch. Try SET CARRIER-WATCH OFF or ON and see if it still "hangs" your line. I suspect that its actually just doing read() or write() calls in "blocking" mode. You might have to SET FLOW-CONTROL NONE, too. There are lots of C-Kermit settings. If you continue to have trouble -- post a message to the comp.protocols.kermit.misc newsgroup (preferred) or send a message to kermit-support@columbia.edu.
When I first started using C-Kermit (all of about two months ago) my initial questions where answered by Frank da Cruz himself (he's the creator of the Kermit protocol and the technical lead of the Kermit project at Columbia University). (That was before he knew that I'm a "journalist" -- O.K. quit laughing!). Frank is also quite active in the newsgroup. I think he provides about 70 or 80 per cent of the technical support for the project.
Oh yeah! If you're using C-Kermit you should get the _Using_C-Kermit_ book. It was written by Frank da Cruz and Christine Gianone -- and is the principal source of funding for the Kermit project. From what I gather a copy of the book is your license to use the software.
-- Jim
 StartX
From: Robert Rambo,
Hi, I was wondering if you can help me out. When I use the command 'startx -- -bpp16' to change the color depth, the windows in X are much bigger than the monitor display. So, nothing fits properly and everything has become larger. But the color depth has changed correctly. I use FVWM as my display manager. Is there some way to fix this problem?
If using the 16 bit plan (16bpp) mode to increase your color depth -- that suggests that selecting this mode is causing the server to use a lower resolution.
That is completely reasonable. If you have a 2Mb video card and you run it in 1024x768x256 or 1024x768x16 -- then you try to run it with twice as many colors -- the video RAM has to come from somewhere. So it bumps you down to 800x600 or 640x480. These are just examples. I don't deal with graphics much so I'd have to play with a calculator to figure the actual maximum modes that various amounts of video RAM could support.
There are alot of settings in the XConfig file. You may be able to tweak them to do much more with your existing video card. As I've said before -- XConfig files are still magic to me. They shifted from blackest night to a sort of charcoal gray -- but I can't do them justice in a little article hear. Pretty much I'd have to lay hands on it -- and mess with it for a couple of hours (and I'm definitely not the best one for that job).
If you haven't upgraded to a newer XFree86 (3.2?) then this would be a good time to try that. The newer one is much easier to configure and supports a better selection of hardware -- to a better degree than the older versions. I haven't heard of any serious bugs or problems with the upgrades.
You may also want to consider one of the commercial servers. Definitely check with them in advance to be absolutely certain that your hardware is supported before you buy. Ask around in the newsgroups for opinions about your combination of hardware. It may be that the XFree86 supports you particular card better than Metro-X or whatever.
You may also want to look at beefing up your video hardware. As I've said -- I don't know the exact figures -- but I'd say that you probably need a 4Mb card for anything like 16bpp at 1024x768. You should be able to look up the supported modes in your card's documentation or on the manufacturer's web site or BBS.
Also, is there some way to change the color depth setting to start X with a depth of 16 every time. I do not use the XDM manager to initiate an X session.
Yes -- it's somewhere in that XConfig file. I don't remember the exact line. I really wish a bona fide GUI X wiz would sign up for some of this "Answer Guy" service.
It doesn't matter whether you use xdm or not. If you put the desired mode in the XConfig file. However -- since you don't you could just write your own wrapper script, alias or shell function to call 'startx' with the -- -bpp16 options. You could even re-write 'startx' (it is just a shell script). That may seem like cheating -- but it may be easier than fighting your way through the XConfig file (do you get the impression that I just don't like that thing -- it is better than a WIN.INI or a SYSTEM.INI -- but not be much).
-- Jim Dennis,
IMAP and LinuxFrom: Brian Moore,
Being a big IMAP fan (and glad to see it finally getting recognition: Netscrape 4 and IE4 will both support it), your answer left a lot out.
Will these support the real features (storing and organizing folders on the server side)?
I heard that NS "Communicator" (the next release Netscape's Navigator series is apparently going to come with a name change) supports IMAP -- but it's possible to implement this support as just a variant of POP -- get all the message and immediately expunge all of them from the server.
It seems that this is how Eric S. Raymond's 'fetchmail' treating IMAP mail boxes -- as of about 2.5 (it seems that he's up to 3.x now)
The easiest IMAP server to install is certainly the University of Washington server. It works, handles nearly every mailbox format around and is very stable. It's also written by the guy in charge of the IMAP spec itself, Mark Crispin. As for clients, there is always Pine, which knows how to do IMAP quite well. This is part of most Linux distributions as well.
I did mention pine. However it's not my personal favorite. Do you know of a way to integrate IMAP with emacs mh-e/Gnus (or any mh compatible folder management system)?
For GUI clients there is ML, which is a nice client, but requires Motif and can be slow as sin over a modem when you have a large mailbox. That's available in source at http://www-CAMIS.Stanford.EDU/projects/imap/ml
I thought I mentioned that one as well -- but it's a blur to me.
I personally avoid GUI's like the plague. I'm typing this from my laptop, through a null modem link to my machine in the other room.
I run emacs under screen -- so I can use mh-e for most mail, Gnus for netnews and for some of my mailing lists (it can show news folders as though they were threaded news groups). screen allows me to detach my session from my terminal so I can log out, take off with the laptop, and re-attach to the same session later (via modem or when I get back home).
Asking on the mailing list about static linked linux versions will get you one (and enough nagging may get them to actually put one of the current version up). ML is really the nicest mail client I have ever used. As for pop daemons with UIDL support, go for qpopper from qualcomm. ftp.qualcomm.com somewhere. Has UIDL and works fine.
O.K. I'll at that to my list.
Does that one also support APOP's authentication mechanism (which I gather prevents disclosing your password over an untrusted network by using something like an MD5 hash of your password concatenated with a date and time string -- or something like that)?
Does qpopper allow you to maintain a POP user account file that's separate from your /etc/passwd file?
Do you know of an IMAP server that supports these sorts of features (secure authentication and separate user base)?
(I know this probably seems like a switch -- the so called "Answer Guy" asking all the questions -- but hey -- I've got to get my answers from *somewhere*)
-- Jim
More IMAPFrom: Graham Todd,
PINE - one of the easiest to use mail clients around - does IMAP just fine. You can read mail from multiple servers and mailboxes and save it locally or in remote folders on the servers - which is what IMAP is all about: Internet Message Access Protocol = flexible and configurable *access* to mail servers without having to pop and fetch messages all over the place (but still having the ability save locally if you want).
The Netscape's Communicator 4.0b2 thing does too but there are so many other ugly bits that I'm not gonna bite.
Jeez pretty soon with this fancy new IMAP stuff you'll be able to do almost as much as you can right now with emacs and ange-ftp (which I use regularly to access remote mail folders and boxes with out having to login - it's all set up in .netrc). Of course the answer is almost always "emacs" .... BTW Linux makes a GREAT program loader for emacs ;-)
Seems kind of kludgey. Besides -- does that give you the main feature that's driving the creation of the IMAP/ACAP standards? Does it let you store your mail on a server and replicate that to a couple of different machines (say your desktop and your laptop) so you can read and respond to mail "offline" and from *either* system?
Yeah, more or less. If you save the mail on your server to local folders or make a local folder be /me@other.mail.host:/usr/spool/me. Using ange-ftp to me seem exactly like IMAP in Pine or Netscape communicator 4.0b2. Though apparently IMAP will update folders across hosts so that only that mail deleted locally (while offline) will get deleted on the remote host on the next login etc. etc. I don't know much about IMAP's technical standard either but find I get equal mail management capability from ange-ftp/VM. (equal to Pine and Communicator so far).
WARNING: In a week or so when I get time I'm gonna ask you a tricky question about emacs and xemacs.
Feel free. Of course I do know a bit more about emacs than I do about X -- so you may not like my answer much.
Heh heh OK... (comp.emacs.xemacs is silent on this). Emacs running as emacs -nw in a tty (i.e console or an xterm) runs fine and lets me use all the job control commands (suspend/fg etc) but with Xemacs job control won't work unless I'm running as root. That is if I'm running "xemacs" or "xemacs -nw" in an xterm or at the console and do C-z and then once I'm done in the shell I do "fg", xemacs comes back but the keyboard seems to be bound to the tty/console settings (Ctrl-z Ctrl-s Ctrl-q etc all respond as if I were in a dumb terminal). The only recourse is to Ctrl-z back out and kill xemacs. This does not happen if I run xemacs setuid root (impractical/scary) or as root (scary). Something somewhere that requires root permission or suid to reset the tty characteristics doesn't have it in xemacs - but does in emacs... My only response so far has been that "you'll have to rebuild/recompile your xemacs" - but surely this wrong. Does anything more obvious occur to you? I feel it must be something simple in my set up (RH Linux 2.0.29). Of course if I could get this fixed I'd start feeling more comfortable not having GNU-Emacs on my machine ;-) which may not be an outcome you would favour.
I once had a problem similar to this one -- suspending minicom would suspend the task and lock me out of it. It seemed that the ownership of the tty was being changed.
So -- the question comes up -- what permissions are set on your /dev/tty* nodes. It seems that most Linux distributions are set up to have the login process chown the these to to the current user (and something seems to restore them during or after logout).
I don't know enough about the internals of this process. I did do a couple of experiments with the 'script' command and 'strace' using commands like:
strace -o /tmp/strace.script /usr/bin/script
... and eyeballing the trace file. This shows how the script command (which uses a psuedo tty -- or pty) searches for an available device.
I then did a simple 'chown 600 /dev/ttyp*' as root (this leaves a bunch of /dev/ttyq* and /dev/ttyr nodes available). The 'script' command then reports that the system is "out of pty's."
Obviously the script command on my system don't do a very thorough search for pty's. It effectively only looks at the first page of them.
The next test I ran was to add a new line to my /etc/services file (which I called stracetel) -- and a new line to me /etc/inetd.conf that referred to it.
This line looks like this:
stracetel  stream  tcp     nowait  root    /usr/sbin/tcpd  \
        /usr/bin/strace -o /root/tmp/t.strace /usr/sbin/in.telnetd
... all on one line, of course.
Then I connected to that with the command:
telnet localhost stracetel
This gives me an strace of how telnetd handles the allocation and preparation of a pty. Here, as I suspected, I saw chown() and chmod() calls after telnetd did it's search through to list of pty's to find the first one.
Basically both programs (and probably most other pty clients) attempt to open each pty until one returns a valid file descriptor or handle. (It might be nice if there was a system call or a daemon that would allow programs to just say "give me a pty" -- rather than forcing a flurry of failed open attempts -- but that's probably too much to ask for.
There result of these experiments suggests that there are many ways of handling pty's -- and some of them may have to be set as compile time options for your system.
It may be that you just need to make all the pty's mode 666 (which they are on my system) or you might chgrp them to a group like tty or pty, make them mode 660 and make all the pty using programs on your system SGID.
I've noticed that all of my pty's are 666 root.root (my tty's root.tty and ttyS*'s are root.uucp all are mode 660 and all programs that need to open them are either root run (getty) or SGID as appropriate).
Some of the policies for ownership and permissions are set my your distribution. Red Hat 2.x is *old* and some of these policies may have changed in the 3.03 and 4.1 releases. Mine is a 3.03 with *lots* of patches, updated RPM's and manually installed tarballs.
Frankly I don't know *all* of the security implications of having your /dev/tty* set to mode 666. Obviously normal attempt to open any of these while they're in use return errors (due to the kernel locking mechanisms). Other attempts to access them (through shell redirection, for example) seem to block on I/O. I suspect that a program that improperly opened it's tty (failed to set the "exclusive" flag on the open call) would be vulnerable.
Since you're an emacs fan -- maybe you can tell me -- is there an mh-e/Gnus IMAP client?
No Kyle Jones (VM maintainer/author) has said maybe IMAP4 for VM version 7. I think his idea is to make VM do it what it does well and rely on outside packages to get the mail to it ...
Also -- isn't there a new release of ange-ftp -- I forget the name -- but I'm sure it changed named too.
Yes it's called EFS - it preserves all the functionality but is more tightly meshed with dired - supposedly it will be easier to use EFS in other elisp packages (I don't know why or how this would be so).
I'll have to play with those a bit. Can VM handle mh style folders?
-- Jim
UUCP QuestionsFrom: David J. Weis,
I had a couple minor questions on UUCP. If you have a few minutes, I'd appreciate the help immensely. I'll tell you a little bit about what we're doing.
Glancing ahead -- I'd guess that this would take quite a bit more than a few minutes.
My company has a domain name registered (plconline.com) and two offices. One is the branch office which is located in the city with the ISP. The head office is kind of in the sticks in western Iowa. I've been commissioned to find out how difficult it would be to set up the uucp so the machine in Des Moines (the big city ;-) would grab all the domain mail and then possibly make a subdomain like logan.plconline.com for all the people in the main office to use email.
This would all be running on RedHat 4 over dialup uucp. The system in Des Moines uses uucp over tcp because it has to share the line with masquerading, etc.
Thanks for any advice or pointers you have.
Unfortunately I this question is too broad to answer via e-mail. O'Reilly has a whole book on uucp and there are several HOW-TO's for Taylor UUCP and sendmail under Linux.
My uucp mostly works but I haven't configured it to run over TCP yet. I also haven't configured my system to route to any uucp hosts within my domain.
You can address mail to a uucp host through a DNS by using the '%' operator. For example I can get my main mail system (antares.starshine.org) to forward mail to my laptop using an address like:
jim%mercury@starshine.org
... the DNS MX record for starshine.org routes mail to my ISP. My ISP then spools it up in UUCP until my machine (antares) picks it up. The name antares is basically transparent to most of this process.
When antares gets the mail it converts the percent sign into a "bang" (!) and spools it for mercury (which happens to be my laptop).
Obviously requiring all of your customers and correspondents to use percent signs in their addressing to your users is not going to work very well. It will probably result in alot of lost mail, alot of complaints and a constant barrage of support calls.
There are two ways to make your internal mail routing transparent to the rest of world. You can create a master aliases list on your mail hub (the easy way) or you can create DNS and MX entries for each of the hosts.
If you'd like more help we could arrange to talk on the phone. UUCP is difficult to set up for the first time (nearly vertical initial learning curve). Once it's set up it seems to be pretty low maintenance. However my meta-carpus can't handle explaining the whole process via e-mail (and I don't understand enough of it well to be brief).
-- Jim
Using MS-DOS FloppiesFrom: Barry,
Hi, I have a problem that I can't find the solution to:
I run Redhat 4.1 with mtools already installed, with it, I can copy a file to or from a dos disk in A: with mcopy etc.. But if I change the disk & do mdir, it tells gives me the listing of what was in the last disk. The only solution is to wait hours for the cache to expire before I can look at another disk.
The problem occurs no matter how I access the floppy, I also tried using dosemu, and mount, but I have the same problem. I can read and write from the first disk that I put in with no problems, but if I change the disk, the computer acts as if the first disk is still in the drive. It also doesn't matter who I am loged in as eg. root has the same problem. I also upgraded mtools to 3.3 but no change.
Is there some way to disable the disk cache (I assume thats the problem) for the floppy drive?
You probably have a problem with the "change disk" detection circuitry on your floppy.
There's a pretty good chance that you'd see the same thing under DOS too.
Unfortunately I don't know of an easy way to solve this problem. You could try replacing the floppy ($30 or so) the controller ($20 -- to ???) and/or the cable.
If that's not feasible in your case you could try something like a mount/sync/umount (on a temporary mount point). This might force the system to detect the new floppy. It's very important not to try to write anything to a floppy when the system is confused about which floppy is in there.
DOS systems that I have used -- while they were afflicted with this problem -- sometimes severely trash the directories on a diskette in that situation.
It probably doesn't even matter if the mount, sync, umount that I describe fails -- just so the system is forced to "rethink" what's there. I'd consider writing a short script to do this -- put a temporary mount point that's "user" accessible to avoid having to be root to do this (and especially to avoid having to create any SUID root perl scripts or write a C wrapper or any of that jazz).
Here's a sample line for your /etc/fstab:
# /etc/fstab
/dev/fd0                  /mnt/tmp       umsdos  noauto,rw,user 0 0
(according to my man pages the "user" options should imply the nosuid, nodev etc. options -- which prevent certain other security problems).
So your chdisk script might look something like:
   #! /bin/sh
        /bin/mount /mnt/tmp
        /bin/sync
        /bin/umount /mnt/tmp
... you could also just do a 'mount /mnt/tmp' or a 'mount /mnt/a' or whatever you like for your system -- and just use normal Linux commands to work with those files. The mtools are handy sometimes -- but far from indispensable on a Linux system with a good fstab file.
As a security note: mount must be SUID in order to allow non-root users to mount filesystems. Since there have been security exploits posted on mount specifically and various other SUID files chronically, I suggest configuring mount and umount such that they can only be executed by members of a specific group (like a group called "disk" or "floppy"). Then you can add yourself and any other users who have a valid reason to work at your console to that group. Finally change the permissions on mount and umount to something like:
-r-sr-x--- 1 root disk .... /bin/mount
.... i.e. don't allow "other" to execute it.
This also applies to all your SVGALib programs (which should not be executed except from the console) and as many of your other SUID programs as you can.
(... it would be nice to do that to sendmail -- and I've heard it's possible. However it's a bit trickier than I've had time to mess with on this system).
As PAM (pluggable authentication module) technology matures you'll be able to configure your system to dynamically assign group membership's based on time of day and source of login (value of `tty`).
This will be nice -- but it doesn't appear to be quit ready yet.
-- Jim
I just wanted to write to thank you for you response to my mail. I did as you suggested and the problem is solved!
Actually, you were also right about the problem occurring in DOS as I used to have a lot of floppies go bad before I went all the way to linux, but I didn't make the connection.
Anyway, thanks again, you've made my day!
Barry
You're welcome. I'm glad it wasn't something complicated. BTW: which suggestion worked for you? Replacing one or another componenent? Or did you just use the "mount, sync, umount" trick?
Under DOS I used to use Ctrl-C, from the COMMAND.COM A: prompt to force disk change detection. You can use that if you still boot this machine under DOS for some work.
-- Jim
inetd QuestionsFrom: Benjamin Peikes,
Answer guy,
I have two questions for you.
1) I'm using one machine with IPAliasing and was wondering if there is a version of inetd built so that you can have different servers spawned depending on the ip number connected to.
That's an excellent question. There is apparently no such feature or enhanced version of inetd or xinetd.
It also doesn't appear to be possibly to use TCP Wrapper rules (tcpd, and the /etc/hosts.allow and /etc/hosts.deny) to implement this sort of virtual hosting.
So far it appears that all of the support for virtual hosting is being done by specific applications. Apache and some other web servers have support for it. The wu-ftpd's most recent versions support it.
I suspect that you could create a special version of inetd.conf to open sockets on specific local IP addresses and listen on those. I would implement that as a command line option -- passing it a regex and/or list of ip addresses to listen on after the existing command line option to specify which configuration file to use. Then you'd load different copies of this indetd with commands like:
   /usr/sbin/inetd /etc/inetd.fred 192.168.14.0 17.18.0.0
/usr/sbin/inetd /etc/inetd.barney barneyweb
/usr/sbin/inetd /etc/inetd.wilma 192.168.2.3
(This would be something like -- all of the 192.168.14.* address and all of the 17.18.*.* addresses are handled by the first inetd -- all of the access to a host named barneyweb (presumably looked up through the /etc/hosts file) would be handled by the next inetd. and all of the accesses to the ipalias 192.168.2.3 would be handled by the last one)
This would allow one to retain the exact format of the existing inetd files.
However I don't know enough about sockets programming to know how much code this would entail. The output of 'netstat -a' on my machine here shows the system listening on *:smtp and *:telnet (among others). I suspect that those stars would show up different if I had a socket open to a specific service on a specific service.
This scheme might use up to many file descriptors. Another approach would be to have a modified tcpd. This would have to have some option where by the destination *as well as* the source was matched in the /etc/tcpd.conf file(s).
(Personally I think that tcpd should be compiled with a change -- so that the single tcpd.conf file is used in preference to the /etc/hosts.allow and /etc/hosts.deny files. Current versions do support the single conf file -- but the naming is still screwy).
I'm not sure quite how Wietse would respond to this -- possibly by repeating the question:
"If you want me to add that -- what should I take OUT?"
(which is what he said one to me when I suggested merging his chrootuid code with tcpd).
I've blind copied Wietse on this (Hi!). I doubt he has time to read the Linux Gazette.
2) A related problem: I have one machine running as a mail server for several domains where the users are using pop to get their mail. The problem is that the From: line always has the name of the server on it. Is there a way to use IPaliasing to fix this? Or do I have to muck around with the sendmail.conf file?
This is becoming a common question.
Here's a couple of pointers to web sites and FAQ or HOWTO documents that deal specifically with "Virtual Mail Hosting"
(look for references to "virtualdomains")
... and here's one guide to Virtual Web Hosting:
I guess the best way to do this would be to change inetd to figure out on which interface the connection has been made on and then pick the correct inetd.conf to reference, like
inetd.conf.207.122.3.8
inetd.conf.207.122.3.90
I would recommend that as a default behavior. I suggested adding additional parameters to the command line specifically because it could be done without breaking any backward compatibility. The default would be to simply work as it does now.
I still suspect that this has some scalability problems -- it might not be able to handle several hundred or several thousand aliased addresses.
I might still be useful to implement it as a variation of -- or enhancement to -- tcpd (TCP_Wrappers).
I think that inetd reads in the configuration file when it starts because it needs a SIGHUP to force it to reread the conf file. All you would have to do is make it reference the right table.
This is also documented in the inetd man page.
Do you know where I could find the code? I would be interested in looking at it?
The source code from inetd should be in the bundle of sources that comes with the "NetKit"
Look to:
ftp:..ftp.inka.de/pub/comp/Linux/networking/NetTools/
and mirrored at:
ftp://sunsite.unc.edu/pub/Linux/system/network/NET-3-HOWTO/
... this includes the history of it's development and the names of people who were active in it at various stages.
If you're going to try to hack this together -- I'd suggest a friendly posting to the comp.linux.development.system newsgroup -- and possibly some e-mail to a couple of carefully chosen people in the NET-3-HOWTO.
-- Jim
Navas Modem FAQFrom: John Doe
The next time you answer a modem question, you'd do well to recommend reading of the very good Navas Modem FAQ at http://www.aimnet.com/~jnavas/modem/faq.html/
Well, here's someone who wants to make a anonymous tip to "The Answer Guy."
At "John Doe's" request I looked over this site. It does have extensive information about modems -- including lots of press releases about which companies are acquiring each other (3Com over US Robotics, Quarterdeck gets DataStorm).
However there didn't appear to be any references to Linux, Unix or FreeBSD.
So -- if one needs information about modems in general this looks like an excellent site to visit. However it the question pertains specifically to using your modem with Linux -- I'd suggest: http://sunsite.unc.edu/LDP/HOWTO/Serial-HOWTO.html
-- Jim
Setting Up a ModemFrom: Yang,
I have an AT 3300 card( from Aztech) which integrates the function of sound card and 28.8K modem. It seems that it need a special driver for its modem function to be work. In MSDOS, there is a aztpnp.exe for that purpose. Do you know is there any way I can get the card work (at least its modem function) in Linux?
Tianming Yang
I'm not familiar with that device. The name of the driver suggests that this is a Plug 'n Play (pnp) device (sometimes we use the phrase "plug and *pray*" -- as it can be a toss of the dice to see if they'll work as intended.
My guess would be that this is a PCMCIA card for a laptop system (which I personally pronounce "piecemeal").
Did you look in the "Hardware HOWTO" (start at www.ssc.com, online mirror of FAQ's and HOWTO's)?
Did you go to Yahoo! and do a keyword search on the string:
linux +aztech
... (the plus sign is important there)?
Since all of the real details about the configuration of the card are determined by the manufacturer (Aztech in this case) I would start by contacting them.
If they've never heard of Linux -- or express no interest in supporting it -- please consider letting them know that Linux support affects your purchasing decisions. Also let them know that getting support for Linux is likely to cost them very little.
How to get a Linux driver for your hardware:
If you are a hardware company that would like to provide support for Linux and FreeBSD and other operating systems -- but you don't have the development budget -- just ask.
That's right. Go to the comp.os.linux.development.system newsgroups and explain that you'd like to provide full documentation and a couple of units of your hardware to a team of Linux programmers in exchange for a freely distributable driver. Be sure to make the sources for one of your other drivers (preferably any UNIX, DOS, or OS/2 driver) available to them.
If you don't like that approach, consider publishing the sources to your existing drivers. If you are really in the hardware business than the benefits of diverse OS support should far outweigh any marginal "edge" you might get from not letting anyone see "how you do it."
(Just a suggestion for all those hardware vendors out there).
-- Jim
User IdentificationFrom: Dani Fricker,
i need your help. for some reasons i have to identify a user on my webserver by his/her ip-address. fact is that users logon comes from different physical machines. that means that i have to assign something like a virtual ip-address to a users log name. something like a reversal masquerading.
The IP Address of any connecting client is provided to any CGI scripts you run, and is stored in the server's access log (or a reverse DNS lookup of it is stored therein -- depending on your httpd and configuration).
* Note: I suggest disabling reverse DNS lookup on webserver wherever possible. it generates alot of unnecessary traffic and you can isolate, sort, and look up the IP addresses in batches when you want to generate statistics involving domain names.
(I also tend to think that most of the reports done on web traffic logs have about as much rigor and resemblance to statistical analysis as reading chicken entrails).
my ip-gateway connects my inner lan over two token ring network cards (sorry, not my idea!) with the internet (lan <-> tr0 <-> tr1 <-> internet). the masquerading forward roule of ipfwadm gives me the possibility to indicate a source and a destination address.
Oh. So all of the clients that you're interested in are on a private LAN and going through a masquerading/NAT server (network address translation).
I would try using ident for starters. Run identd on your Masquerade Host and make calls to the ident service from your CGI scripts. I don't think it will work -- but it should be worth a little info.
From there you might be able to configure all the clients on the inner LAN to use an *applications* level proxy (squid -- formerly cached, CERN httpd, or the apache cache/ proxy server). Masquerading can be thought of as a "network layer proxying services" while SOCKS, and similar services -- which work with the co-operation of the client software -- are applications layer proxies.
I don't know if the private net IP address or other info will propagate through any of these HTTP proxies.
If this is *really* important to you, you could consider writing your own "NAT Ident" service and client. I don't know how difficult that would be -- but it seems like the code for the identd (and the RFC 931? spec) might give you a starting point for defining a protocol (you might want to secure that service under TCP_Wrappers). You might want to consider making this a TCP "Multiplexed" service -- look for info on tcpmux for details about that.
The gist of tcpmux is that it allows your custom client to talk to a daemon on TCP port 1 of the server host and ask for a service by name (rather than relying on "Well-Known Port Addresses"). So, if you're going to create a new service -- it makes sense to put it under tcpmux so you don't pick your own port number for it -- and then have the IANA assign that port to something else that you might want later.
do you see a possibility for an 'address assignment' between the two interfaces? if you do please let me know.
I don't know of any existing way to determine the IP address of a client on the other side of any NAT/masquerading host -- I'm not even sure if there's any existing way to do it for a client behind a SOCKS or TIS FWTK or other applications level proxy.
I'll be honest. With most "Answer Guy" questions I do some Yahoo!, Alta-vista and SavvySearch queries -- and ask around a bit (unless I already know the answer pretty well -- which doesn't happen all that often these days). I skipped that this time -- since I'm pretty sure that there's nothing out there that does this.
I welcome any corrections on this point. I'll be happy to forward any refutations and corrections to Dani.
All of this begs the greater question:
What are you really trying to do?
If you are trying to provide some form of transparent access control to your webserver (so local users can see special stuff without using a "name and password") -- there are better ways available.
Netscape and Internet Explorer both support a form of client-certificate SSL -- which is supported at the server side by the Stronghold (commercial Apache) server.
As an alternative -- I'd look at the possibility of finding or writing a Kerberos "auth" module for Apache (and deploying Kerberos to the clients). This might be more involved than you're management is willing to go for -- but writing new variations of the indentd service might also fall into that category.
IP addresses are a notoriously bad form of access control. If you have a properly configured set of anti-spoofing rules in the packet filters on your router -- and you can show that no other routes exist into your LAN -- then you can base access controls to services (TCP/Wrappers) to about the granularity of "from here" and "not from here." Attempting to read more into them than that is foolhardy.
Ethernet and Token Ring MAC (media access control) addresses (sometimes erroneously called "BIA's" -- burned in addresses) are just about as bad (most cards these days have options to over-ride the BIA with another MAC -- usually a feature of operating the card in "promiscuous" mode).
Yet another approach to the problem might be to simply put a web server on the internal LAN (no routing through the NAT/masquerading host) -- and use something like rdist to replication/mirror the content between the appropriate document trees on the internal and exterior web servers.
Basically we'd need to know much more about your requirements in order to give relevant recommendations.
-- Jim
Duplicating a Linux Installed HDFrom: Mohammad A. Rezaei,
I just read your response to duplicating a hard drive using dd. I think using dd limits the uses of this technique too much.
I absolutely agree. I wonder where I suggested 'dd' without expressing my misgivings.
Please consider quoting little portions of my posting when making references to them -- I write alot and can't remember past postings without some context.
I have more than once installed/transfered entire hard drives using tar. simply put both drives in the same machine, mount the new drive in /mnt and do something like
tar -c -X /tmp/excludes -f / | (cd /mnt; tar xvf -)
        The file....

/tmp/excludes should contain:

        /mnt
        /proc
 and any other non-local, mounted drives, such as nfs mount points.
There are better ways to do this. One way is to use a command like:
                find ... -xdev -type f | tar cTf - - | \
                        (cd ... && tar xpf - )

        Another is to use:

                find ... | cpio pvum /new/directory

        ... which I only learned after years of using
        the tar | (cd ... && tar) construct.
In both of these cases you can use find parameters to include just the files that you want. (Note: with tar you *must* prevent find from printing any directory names by using the -type f (or more precisely a \! -type d clause) -- since tar will default to tar'ing any directories named in a recursive fashion).
The -T (capital "tee") option to GNU tar means to "Take" a list of files as an "include" list. It is the complement to the -X option that you list.
You can also pipe the output of your find through grep -v (or egrep -v) to filter out a list of files that you want to exclude.
finally, one has to install the drive onto the new machine, boot from floppy and run lilo. The disks don't have to be identical. the only disadvantage is having to run lilo, but that's takes just a few minutes.
The only message I can remember posting about 'dd' had an extensive discussion of using tar and cpio for copying trees. Am I forgetting one -- or did you only get part of my message?
Hope this helps.
Hopefully it will help some readers. The issues of copying file trees and doing differential and incremental backups is one that is not well covered in current books on system administration.
When I do a full backup I like to verify that it was successful by extracting a table of contents or file listing from the backup media. I then keep a compressed copy of this. Here I use tar:
tar tf /dev/st0 | gzip > /root/tapes.contents/.....
.... where the contents list is named something like:
antares-X.19970408
.... which is a hostname, a volume (tape) number and a date in YYYYMMDD format (for proper collation -- sorting).
To do a differential I use something like:
   find / -newer /root/tape.contents/....  \
                        | egrep -v "^(/tmp|/proc|/var/spool/news)" \
                        | tar czTf - /mnt/mo/diff.`date +%Y%m%d`.tar
... (actually it's more complicated than that since I build the list and compute the size -- and do some stuff to make sure that the right volume is on the Magneto Optical drive -- and mail nastygrams to myself if the differential won't fit on that volume -- if the volume is the most recent one (I don't overwrite the most recent -- I rotate through about three generations) -- etc).
However this is the core of a differential backup. If you wanted an incremental -- you'd supply a different file to the -newer switch on your find command.
The difference between differential and incremental is difficult to explain briefly (I spent about a year explaining it to customers of the Norton Backup). Think of it this way:
If you have a full -- you can just restore that.
If you have a full, and a series of differentials, you can restore the most recent full, and the most recent differential (any older fulls or differentials are unneeded)
If you have a full and a series of incrementals you need to restore the most recent full, and each subsequent incremental -- in order until the most recent.
It's possible (even sensible in some cases) to use a hybrid of all three methods. Let's say you have a large server that takes all day and a rack full of tapes to do a full backup. You might be able to do differentials for a week or two on a single tape per night. When that fills up you might do an incremental, and then go back to differentials. Doing this to a maximum of three incrementals might keep your all day backup marathons down to once a month. The restore must go through the "hierarchy" of media in the correct order -- most recent full, each subsequent incremental in order, and finally the most recent differential that was done after that.
(Personally, I avoid such complicated arrangements like the plague. However they are necessary in some sites.)
-- Jim


cp /usr/sbin/ppp-on to /usr/sbin/ppp-on.anysuffix
Then open the file you just created with a text editor, and change any information that applies to the secondary ISP, eg. dialup, the IP number of the ISP, username and password. write the file(save it) and try your new executable, ppp-on.anysuffix. Just a quick pointer, you could call your new script any name you want as long as there's no other file with the same name in your path,preferably no other file with the same name at all
These days most Internet Service Providers assign you a Dynamic IP when you logon to their network, due to the cost of assigning every customer a static IP. At present there are only so many IP addresses available and, apparently each one costs to register. Consequently ISPs buy a pool of IP addresses within a range and assign an available one at login. For most uses, such an arrangement is no problem, assuming that most internet usage consists of interaction between the ISP's computer and the local one. For some purposes, however such as allowing telnet or ftp to your computer the dynamic scheme is less than ideal. Here's a relatively painless way to get your current IP, so you can run with the big dogs. Open an xterm, or rxvt and type:
ifconfig
which will bring up some info in two blocks. You'll want to note the bottom block, which will have a line that specifies your inet address expressed numerically. It will be in a xxx.xxx.xxx.xxx format, which corresponds to the standard IP address, in fact that's what it is. you ca write this number down or just highlight this IP address(to paste it)and type:
nslookup the.num.ber.
the number being your inet address from the last step. It may take a couple of minutes, but you will get a two line messagethat looks like:
Name:   your Fully Qualified Domain Name
                Address: IPa.ddr.ess.!!!
we may talk about FQDN some more another time, but for the purpose at hand, just type:
hostname Name
where Name is the first line from the above step. That's it, except that you must repeat this procedure every time you connect to your ISP. You might be able to write a script to automate this procedure, but in the meantime which as my friend Al used to say "is a groovy time", you can use this knowledge to run remote X apps(just a minute,I'm coming to that) allow your friends or inet associates to telnet to your computer, or ftp files from a telnetted site(this too, momentarily).What you need to know is that the next time youreboot, you may get a message saying that your computer name is "bad". This isn't a comment on your lack of originality or taste, and you should basically ignore it.
hostname
as detailed above. If you have a static IP address, you can skip this step.What needs to be done next is to type:
xhost + the.telnet.box
When you hit enter you will see a message like, "the.telnet.box has been added to the control list". You will probably have to restart your window manager, your mileage may, as they say, vary. Now when you start a telnet session, you can enter the name of an X application and in a moment, the application window will apear on your screen, even if you don't have it installed on your computer. Do your work, play your game, and marvel at the ramifications of this capability.
You can also invite friends and coworkers over to your computer to do some work, socialize or learn something, in the following manner. Obtain your FQDN, or IP address, as detailed above. E-mail it to them or call them on the phone to let them know where you are today(Not where you want to go today, that's another "OS"). they can then:
telnet FQDN or ftp IPa.ddr.ess.!!!
and all of a sudden they're in your den, or office or wherever you keep your computer. For more sophisticated methods of getting your address, read the "Dynamic IP hacks-HOWTO.
This esteemed tabloid is just full of novice- to intermediate level tips and tricks.The Answer Guy, Two Cent Tips, and The Weekend Mechanic in particular, are good sources of the kinds of things that will make you a demi-guru in no time at all.
In DOS and Windows,formatting a floppy disk is a one shot affair which formats, erases data, and creates a file system on the floppy. In linux however, you have to format and create the filesystem in separate steps. At first glance, this seems backward, after all, isn't linux a more sophisticated OS? Why do things in two steps that the others do in one? The reason is that linux can read several filesystems so that data can be moved from one OS to the other. By mounting the floppy drive as MSDOS, VFAT, or other filesystem type the data can be read from the mount point in a manner that linux can make use of.
have trouble with the
find
command?Try leaving your computer on overnight, and the next day use the
locate /filename |less
command instead. Locate is a database that is gathered during idle times on your computer Actually locate reads a database that is updated by a command in your system files, but if you give it time to breathe, usually overnight, it can locate any file on your hard drive(s). You can also try
whereis filename
and you will get a location for the named file.
TTYL, Mike List
In this article I will describe a configuration tool called The Dotfile Generator (TDG for short). TDG is a configuration tool, which configures programs, using X11 widgets like check boxes, entries, pull-down menus etc.
For TDG to configure a given program a module must be made for it. At the moment modules exist for the following programs: Bash, Fvwm1, Fvwm2, Emacs, Tcsh, Rtin and Elm.
The article will describe common use of TDG, so if you do not have it yet, it might be a good idea to download it (It's free!) You may also go to the home page of the Dotfile Generator for further information.
A basic concept in UNIX is that the programs are very configurable. Here is an example from Emacs, which shows this:
What should be done if the user asks to go to the next line at the of a file?Since the program works without a GUI, the standard method for configuring such options is to use a dot-file. In this file, you may program, which method you will use.
There are two logical possibilities:Instead of implementing only one of the solution the people behind Emacs, have chosen to implement both, and let you decide which one you prefer.
- Insert a blank line, and move to it.
- Beep, to tell the user that there is no next line.
This solution, however, requires that the user has to learn the programming language used in the dot-file, and has to read lots of documentation to find out which configurations can be made. This task may be difficult and tedious, and for that reason many users often choose to use the default configuration of the program.
If you take a look at some dot-files, you may find that most of the configurations can be described by the following items:
When you start TDG, you will be offered a list of standard configurations, where you may pick one to start out with. This may be convenient, if you do not have a dot-file for the given program, or if you would like to try a new configuration. If on the other hand, you already have a dot-file, which you would like to put the finishing touches to, you may read this file into TDG. Note, however, that it is not all modules, which have the capability to read the dot-file (the fvwm2, rtin and elm modules have, the other modules do not, since it would be to complicated to create such a parser.)
When you have selected a start-up configuration, the menu-window will be displayed (see figure 1). In this window, you can travel through the configuration pages, just like a directory structure. If you select a page, a new window will be displayed, with the configuration for this page (see figure 2). This window will be reused for all the configuration pages, ie. only one configuration page is visible at a time, so you do not have to destroy the window yourself.

Figure 1 |

Figure 2 |
In region 3, information is shown on what will be generated. You have three possibilities:
When you have done all the configurations, you have to tell TDG which file you wish to generate. This is done from the Options menu (Setup->Options). And now it's time to create the actual dot-file, which is done by selecting Generate in the File menu.
Once you have generated the dot-file, you may find that you would like some of the configuration to be different. You could now go to the configuration page in question, change your configuration, and then generate once again. If, however, you are testing several different options for a single configuration (ie. several items from a pull-down menu) you may find it cumbersome to generate the whole module over and over again. In this situation, you may chose Regenerate this page in the File menu. Note, however, that if some part of the configurations on the page effects other pages, these will not be generated, so in these situation you have to generate the whole module.
To see how to use the generated dot-file, please go to the Help menu, and select the How to use the output item.

This ExtEntry has three visible tuples, though only two of them contain values (you can see, that the third one is grayed out). To add a new tuple to the ExtEntry, you have to press the button in the lower right corner, just below the scroll bar. If the ExtEntry contains more tuples than can be shown in it, you may scroll to the other tuples with the scroll bar.
If you press the left mouse button on one of the scissors, a menu with four elements will be displayed. These elements are used to cut, copy and paste tuples within the ExtEntry.
If the tuples get very large, only one of them may be shown on the screen at a time. An example of that is seen in figure 4.
When the tuples contain many widgets, scrolling the ExtEntry becomes slow. In these cases, the ExtEntry may have a quick index. In figure 4, you can see the quick index at the top of the ExtEntry (it's the button labeled Idx.) When this quick index is invoked, a pull-down menu is display with the values of the element associated with the quick index. This makes it much easier to scroll the ExtEntries.

Figure 4 |
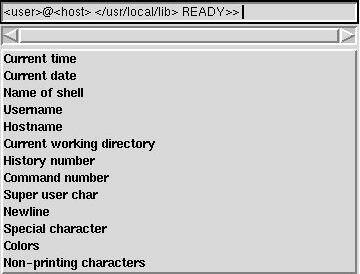
Figure 5 |
In TDG, a special widget has been created called a FillOut, which does configurations like the above. In Figure 5, you can see a FillOut widget from the Bash module. At the top of the widget there is an entry, where you can type ordinary text. Below it, the tokens are placed. If you select one of the tokens, it is inserted in the entry at the point of the cursor. Some of the tokens may even have some additional configurations. Eg. the token Current working directory has two possible options: Full directory, and only the last part. When tokens with additional configurations are selected, a window will be displayed, where these configurations can be done. If you wish to change such a configuration, press the left mouse button on the token in the entry.
The widgets will appear as a button within TDG, and when the button is pressed a new window will be displayed, where the actual configuration is done.
Next time you enter TDG, your saved file will be one of the the files you will be offered as a start-up configuration.
One important point you have to note is that this save file is an internal dump of the state of TDG. This means that this file dependson the version of TDG and the module. This means that if you wish to send a given configuration to another person, this format is not appropriate. A version independent format exists, which is called the export format. To create such a file, you have to select Export instead of Save in the File menu.
Sometimes you may wish to restore the configuration on a single page, to its value as it was before you started playing around with it, or you may wish to merge another person's configuration with your own. This is done by selecting Reload in the File menu. To tell TDG that you only want to reload some of the pages, you have to select the Detail button in the load window. This will bring up a window, where you can select which configuration pages, you wish to reload. Here you can also tell it how you want the pages to be reloaded. You have two possibilities:
It's always a good idea to have a bookmark on this page, as work is currently in progress on new modules.
 |
|
|
|
|
||
 |
muse:
|
|
What a month. Actually, two months. Last month I was busily working on putting together an entry for the IRTC using BMRT. At the same time I was trying to teach myself enough about the RenderMan Interface Specification to put together the second of three articles on BMRT. I didn't succeed in the latter and ended up postponing the article by one month. Because I did this I was able to focus more on learning the interface and worry less about writing. I think this strategy worked. The scene I rendered for this months IRTC is the best I've ever done and I managed to gain enough experience to write a meaningful article on the RenderMan Shading Langauge. One of the reasons I enjoy doing this column is because it exposes me to all sorts of people and software. The world of computer graphics for Linux is constantly growing and the software constantly improves. I hear about new products just about once or twice a week now and I hear about updates to existing packages all the time. Its very difficult to keep track of all the changes (and the fact that I haven't made any updates to the Linux Graphics mini-Howto in some time reflects this) but I enjoy the work. Since things change so often I have found its never clear how many announcements I'll have for any one month. Its gone from famine to feast - with this month being the feast. Most of the announcements in this months column are from April alone. I don't know what happened - maybe all the bad weather around the globe kept people inside and busily working and now that the suns out they're starting to let loose what they've done. I only wish I had the time to examine everything, to play with them all. But my employer would rather I finish my current project first. Has something to do with keeping my salary, so they say. In this months column I'll only be covering two related items. The first is a case study on learning to use BMRT. When you submit an image in the IRTC you are required to submit an ASCII text file describing your image and, to some extent, how you created it. Some people don't put much work into this. I just about wrote a book. Since the information I provided covered more than just BMRT I thought it would be relavent to this column. The second item is the long awaited (well, I waited a long time to finish it anyway) 2nd article on BMRT that covers the RenderMan Shading Language. I think this article came out quite good. I've included quite a few samples and some general explanations on what they do. I want to say right up front that I couldn't have done this without lots of help from BMRT's author, Larry Gritz at Pixar. He was a very willing teacher and critic who offered many tips and ideas for my IRTC entry. Most of that also ended up in this article. Many thanks, Larry. I know I said I'd do an HF-Lab article this month too, but that IRTC entry took more time than I expected. It was quite addicting, trying to get things just right. I have started to review HF-Lab once again and will make it my first priority for next months column. I've already figured out how to use the output from HF-Lab to produce height fields with BMRT. Its quite simple really. Anyway, I hope you enjoy this months articles. Note: I've been asked by a couple of readers about support for 3D hardware support in the various X servers. I'm going to contact the X Server vendors (Xi Graphics, MetroLink, The XFree Project) as well as Brian Paul (the MesaGL author) and see what they have to say. If you are connected with these folks and have some insight I'd love to hear what you have to say. Please if you know if such support is forthcoming and I'll include it in an upcoming Graphics Muse column. |
 |
|
Disclaimer: Before I get too far into this I should note that any of the news items I post in this section are just that - news. Either I happened to run across them via some mailing list I was on, via some Usenet newsgroup, or via email from someone. I'm not necessarily endorsing these products (some of which may be commercial), I'm just letting you know I'd heard about them in the past month. |
|||||||||||||||
 |
|||||||||||||||
Frame grabber device driver for the ImageNation Cortex I video capture card - Version 1.1This adapter is an 512 by 486 resolution 8bit gray scale video capture card. The device can provide data in pgm file format or raw image data.FTP site: ftp://sunsite.unc.edu/pub/Linux/ apps/video/cortex.drv.1.1.tgz Web Site: http://www.cs.ubc.ca/spider/ jennings/cortex.drv.1.1.tgz |
|
|
3DOM - a new 3D modeller project using OpenGL for Linux3DOM is a 3D Modeler for Unix (using HP StarBase or OpenGL/Mesa) that is free for non-commercial use. Source code is available. Binaries for Linux/Intel, SGI, Sparc Solaris and HP-UX are also availalbe.It's not quite 'ready for prime-time', meaning there is almost no documentation and there is still a lot of work to do on the user interface. http://www.cs.kuleuven.ac.be/ |
||||||||||||
|
|||||||||||||||
Pixcon/Anitroll R1.04I found this in my /tmp directory while getting ready for this months column. I couldn't find a reference to it in any other Muse columns so I guess I must have just misplaced it while preparing for an earlier issue. Hopefully, this isn't too out of date.Pixcon & Anitroll is a freely available 3D rendering and animation package, complete with source. Pixcon is a 3D renderer that creates high quality images by using a combination of 11 rendering primitives. Anitroll is a forward kinematic heirarchical based animation system that has some support for some non-kinematic based animation (such as flock of birds, and autonomous cameras). These tools are based upon the Graph library which is full of those neat rendering and animation algorithms that those 3D faqs keep mentioning. It also implements some rendering techniques that were presented at Siggraph 96 by Ken Musgrave and was used to generate an animation for Siggraph '95. New features since version 1.03:
http://www.radix.net/~dunbar/index.html Comments can be emailed to Pixcon is available either through the above web site or at Sunsite. It is currently under: /pub/Linux/Incoming/pixcon104.tgz and will be moved to: /pub/Linux/apps/graphics/pixcon104.tgz NOTE: there is a file pixcon1.04.tgz in those directories, but it's corrupted. Be sure to get the correct files. |
|||||||||||||||
|
|||||||||||||||
ELECTROGIG 3DGOELECTROGIG is a software company specialiced in 3D solid modeling, visualization and animation software. The latest version of 3DGO (version 3.2), a modeling animation and raytracing package, is now available for the Intel Linux platform. A beta version is also available for the MkLinux platform. Take a look at the benchmarks for Linux on the intel platform: http://www.gig.nl/products/prodbench.html.3DGO was originally developed for the SGI platform and is available for the SGI, SUN and HP platforms. For more comprehensive information about 3DGO, check out the WWW-site: http://www.gig.nl/products/prodinfo.html. You can download a demo-version of 3DGO for linux, this version has all functionality, except the save functions. Go to our download area: ftp://ftp.gig.nl/demo/. Please Read the .txt files before downloading. ELECTROGIG Technology |
|||||||||||||||
|
|||||||||||||||
|
|
|
libgr V2.0.12A new version of libgr, version 2.0.12, is now available from ftp.ctd.comsat.com:/pub/linux/ELF/libgr-2.0.12.tar.gz.
libgr will build shared libs on Linux-ELF and on HP/UX. |
||||||||||||
|
|||||||||||||||
EPSCAN - scanner driver for EPSON ES-1200C/GT-9000 scannersEPSCAN is a scanner driver for EPSON ES-1200C/GT-9000 scanners. It includes a driver and a nice Qt-based X frontend. It allows previewing, and selecting a region of an image to be scanned, as well as changing scanner settings. It only supports scanners attached to a SCSI port, not to the parallel port.EPSCAN can be found at The driver should work for any of the ES-{300-800}C / GT-{1000-6500} models as well, but has not been tested on these.
|
|||||||||||||||
|
|||||||||||||||
Inlab-Scheme Release 4Inlab-Scheme Release 4 is now available for Linux/386 (2.X kernel, ELF binary) and FreeBSD.Inlab-Scheme is an independent implementation of the algorithmic language Scheme as defined by the R4RS and the IEEE Standard 1178. In addition to the language core Inlab-Scheme has support for bitmap/greymap processing of several kinds. Inlab-Scheme can be used as a general tool for image processing, OCR or specialized optical object recognition. Inlab-Scheme Release 4 reads and writes multipage tiff/G4, XBM and PNG graphic file formats. Inlab-Scheme Release 4 has built in converters for various patent image file formats (USAPat, PATENTIMAGES and ESPACE). Inlab-Scheme is distributed at http://www.munich.net/inlab/scheme, where additional information about the current state of the project, supported platforms, current license fees and more is available. |
|
|
The Linux Game SDK ProjectThe new WWW page for the Linux Game SDK is athttp://www.ultranet.com/~bjhall/GSDK/. The Linux GSDK Project is a new project which aims to make a consistent and easy to use set of libraries to ease game developers (professional or not) to make first class games under the Linux OS. The GSDK will provide libraries for 2D and 3D graphics, advanced sound, networked games and input devices. It should also improve the development of multimedia applications for Linux. See the Web site for more informations. The GSDK mailing list has moved from linux-gsdk@endirect.qc.ca to . Additionnal lists have been created for the various teams. |
||||||||||||
|
|||||||||||||||
WebMagick Image Web GeneratorWebMagick is a package which supports making image collections available on the Web. It recurses through directory trees, building HTML pages, imagemap files, and client-side/server-side maps to allow the user to navigate through collections of thumbnail images (somewhat similar to xv's Visual Schnauzer) and select the image to view with a mouse click.WebMagick is based on the "PerlMagick" ImageMagick PERL extension rather than external ImageMagick utilities (as its predecessor "Gifmap" is). This alone is good for at least a 40% performance increase on small images. WebMagick supports smart caching of thumbnails to speed montage generation on average size images. After a first pass at "normal" speed, successive passes (upon adding or deleting images) are 5X to 10X faster due to the caching. WebMagick supports a very important new feature in its caching subsystem: it can create and share a thumbnail cache with John Bradley's 'xv' program. This means that if you tell 'xv' to do an update, WebMagick montages will benefit and you can run WebMagick as a batch job to update xv's thumbnails without having to wait for 'xv' to do its thumbnail reduction (and get a browsable web besides!). WebMagick requires the ImageMagick (3.8.4 or later) and PerlMagick (1.0 or later) packages as well as a recent version of PERL 5.
|
|||||||||||||||
|
|||||||||||||||
SIMLIB IG - Commercial librarySIMLIB IG a C library which enables communication with Evans & Sutherland graphics Supercomputers (so called image generators). It enables the user to communicate with Evans & Sutherland image generators (Liberty and ESIG Systems) using a very efficient raw Ethernet protocol. There is no need for using opcodes, since SIMLIB IG provides an API to the functionality of the image generators.Documentation comes printed in English, and source code examples are provided on the distribution media. The software is also available for SGI and NT systems. SIMLIB IG for Linux is $2500 (US)
|
|
|
mtekscan - Linux driver for MicroTek ScanMaker SCSI scannersmtekscan is a Linux driver for MicroTek ScanMaker (and compatible) SCSI scanners. Originally developed for the ScanMaker E6, it is (so far) known to also work with the ScanMaker II/IIXE/IIHR/III/E3/35t models, as well as with the Adara ImageStar I, Genius ColorPage-SP2 and Primax Deskscan Color.The new version of mtekscan is v0.2. It's still in beta testing, but all major options should work without problems. Besides some small bugfixes and minor improvements, the new version contains a couple of new features, most notably:
ftp://fb4-1112.uni-muenster.de/pub/ffwd/ or from sunsite: ftp://sunsite.unc.edu/ pub/Linux/apps/graphics/scanners/ |
||||||||||||
|
|||||||||||||||
PNG binaries for Netpbm tools now availableLinux binaries for pnmtopng, pngtopnm, and gif2png are available at: http://www.universe.digex.net/~dave/files/pngstuff.tgz If you have trouble dowloading that, see http://www.universe.digex.net/~dave/files/index.html for helpful instructions.PNG is the image format that renders GIF obsolete. For details on that, you can visit the PNG home page at: http://www.wco.com/~png/. The only shared libraries you need are libc and libm; all of the others are linked statically. The versions of libraries used to build the programs are those that were publicly available as of 1997-04-06:
|
|||||||||||||||
|
|||||||||||||||
TN-Image Version 2.5.0TN-Image is:
|
|||||||||||||||
|
|||||||||||||||
Did You Know?...that there is a converter available to turn POV-Ray heightfields into RenderMan compliant RIB files for use with BMRT? Florian Hars writes:I've worked on my code, now it uses libpgm and has all the necessary vector routines included, it is on my page (with some comparisions of rendering time and memory consumption): http://www.math.uni-hamburg.de/home/hars/rman/height.htmlFlorian also has some pages of general POV vs. RenderMan comparisons: http://www.math.uni-hamburg.de/home/hars/rman/rm_vs_pov.html ...that there is a freely available RenderMan shader library from Guido Quaroni? The library contains shaders from the RenderMan Companion, Pixar, Larry Gritz and a number of other places. You can find a link to it from the BMRT Web pages at http://www.seas.gwu.edu/student/gritz/bmrt.html. ...that there is an FTP site at CalTech that contains a large number of RenderMan shaders? The collection is similar to Guido Quaroni's archive, except the FTP site includes sample RIB files that use the shaders plus the rendered RIBs in both GIF and TIFF formats. The site is located at ftp://pete.cs.caltech.edu/pub/RMR/Shaders/. Q and A Q: Where can I get a copy of the netscape color cube for use with Netpbm? How should it be used? A: The color cube can be found at the web site for the text Creating Killer Websites at http://www.killersites.com/images/color_cube_colors.gif. The cube can be used in the following manner:
Q: Where can I get models of the human figure? A: Here are two addresses for human figure models. The first is 3DCafe's official disclaimer and the second takes you straight to the human figures. Please read the disclaimer first (although you may need an asp capable browser, such as Netscape 3.x to do so): http://www.3dcafe.com/meshes.htm From the IRTC-L mailing list Q: Is there a VRML 2.0 compliant browser available for Linux? A: Yes. Dimension X's Liquid Reality is a fully compliant VRML 2.0 browser. The download web page says that there will be support as a plug-in for Netscape 3.x soon. This is a commercial product with a free trial version available for download. See http://www.dimensionx.com/products/lr/download/ for more details. From a friendly reader, whose name I absent mindedly discarded before recording it. My apologies. Q: Can anyone tell me how I would go about defining a height field according to a specific set of data points? My goal is to be able to take a topographic map, overlay it with a rough grid, and use the latitude, longitude, and elevation markings as points in a definable 3-D space to create a height field roughly equal to real topography. A: The easiest way is probably to write a PGM file. I wouldn't use longitude and latidude because the length of one degree isn't fixed and it will give reasonable results only near the equator. Use UTM coordinates or superimpose any arbitrary grid on your map which represents approximate squares. P2
# kilimajaro.pgm
15 10
59
10 15 18 20 21 22 23 23 21 20 19 18 17 16 15
11 15 19 22 27 30 30 30 29 28 25 20 19 18 17
13 15 19 21 28 38 36 40 40 35 30 24 20 19 18
15 16 18 20 29 39 37 44 59 44 38 30 22 19 18
15 16 18 20 28 30 30 40 50 46 51 48 28 20 19
15 15 16 17 18 19 20 24 30 35 37 37 30 20 19
15 15 14 15 16 17 18 19 22 29 30 29 27 20 19
15 15 14 13 15 16 15 17 18 20 22 20 20 20 18
15 14 13 11 12 12 12 13 14 15 17 15 15 15 14
14 11 10 9 9 10 10 10 9 10 13 12 11 11 11
Use it with scale <15,1.18,10> to get an to-scale image and with a larger y-scale if you want to see something. The earth is incredibly flat.
From Florian Hars via the IRTC-L mailing list Q: I've been fiddling with some simple CSG using BMRT and have run into a problem. I'm trying to cut a square out of a plane that was created from a simple bilinear patch. Whatever I use to define the square (a box actually) comes out white instead of the background color (black in this case). I dont know what I'm doing wrong and was wondering if someone might take a peek at this for me. A: There are several problems with your RIB file, as well as your use of CSG. The two biggies are: You just can't do this: ObjectBegin 2
SolidBegin "primitive"
TransformBegin
Translate -1 0 0
Rotate -90 0 1 0
Patch "bilinear" "P"
[ -1 -1 0 1 -1 0
-1 1 0 1 1 0 ]
TransformEnd
... etc.
ObjectEnd
Transformations just aren't allowed inside object definitions. Remember that object instances inherit the entire graphics state that's active when they are instanced -- including transformations. So all primitives within the instanced object get the very same transformation. If they're all bilinears like you have them, that means that they will all end up on top of one another.For this reason and others, I urge everybody to not use instanced objects at all for any RenderMan compliant renderer. They're quite useless as described in the RenderMan 3.1 spec. Yes, I know that RenderMan Companion has an example that does exactly what I said is illegal. The example is wrong, and will not work with either PRMan or BMRT. Solid (CSG) operations are meant only to operate on solids. A solid is a boundary representation which divides space into three distinct loci: (a) the boundary itself, which has finite surface area, (b) a (possibly disconnected) region of finite volume (the "inside"), and (c) a connected region of infinite volume (the "outside"). You can't subtract a box from a bilinear patch, since a bilinear patch isn't a solid to begin with. If you want a flat surface with a square hole, there are two methods that I'd recommend: (a) simply use several bilinears (4 to be exact) for the surface, like this: +-----------------------+
| #1 |
| |
+======+---------+======+
| | | |
| #2 | (hole) | #3 |
| | | |
+======+---------+======+
| #4 |
| |
+-----------------------+
Or, (B) if you really want to be fancy, use a single flat order 2 NURBS patch with an order 2 trim curve to cut out a hole.
From Larry Gritz <> |
|||||||||||||||
|
|||||||||||||||
 |
Correcting for display gamma This past 2 months I've been hard at work on an entry for this round of the IRTC, the Internet Ray Tracing Competition. In previous rounds I had submitted entries using POV-Ray, but for this round I switched to BMRT, mostly so I could learn the RenderMan API and how to write shaders using the RenderMan shading language. This months main article is the second of a three part series on BMRT. The BMRT package is written by Larry Gritz, and Larry was gracious enough to offer some wonderful critiques and tips on my image. This past 2 months I've been hard at work on an entry for this round of the IRTC, the Internet Ray Tracing Competition. In previous rounds I had submitted entries using POV-Ray, but for this round I switched to BMRT, mostly so I could learn the RenderMan API and how to write shaders using the RenderMan shading language. This months main article is the second of a three part series on BMRT. The BMRT package is written by Larry Gritz, and Larry was gracious enough to offer some wonderful critiques and tips on my image.During out email correspondence, Larry noticed I had overlit my scenes quite badly. While we tried to figure out what was causing this (it turned out to be a misuse of some parameters to some spotlights I was using) he asked if I had gamma corrected for my display. Gamma correction is a big issue in computer graphics, one that is often overlooked by novices. I'd heard and read quite a bit about gamma correction but had never really attempted to determine how to adjust the gamma for my display. Larry offered an explanation, a quick way to test the gamma on my system, and a tip for adjusting for gamma correction directly in the BMRT renderer, rendrib. I thought this would be a great thing to share with my readers, so here it is. Rendrib produces linear pixels for its output -- i.e. a pixel with value 200 represents twice as much light as a pixel of value 100. Thus, it's expected that your display will be twice as bright (photometrically, not necessarily perceptually) on a pixel of 200 than one of 100. This sort of display only really happens if you correct for gamma, the nonlinearity of your monitor. In order to check this, take a look at the following chart. Display the chart as you'd view any image. You'll notice that if you squint, the apparent brightness of the left side will match some particular number on the right. This is your gamma correction factor that must be applied to the image to get linear response on your particular monitor. |
||||||
|
If your display program uses Mesa (as rendrib's framebuffer display does), you can set an environment variable, MESA_GAMMA, to this value and it will transparently do the correction as it writes pixels to the screen. Most display programs let you correct gamma when you view an image, though I've had trouble getting xv to do it without messing up the colors in a weird way. Another alternative is to put the following line in your RIB file: Exposure 1 <gamma> |
|
|
|
|
||
| where gamma was what you measured with the chart. This will cause rendrib to pre-correct the output pixels for the gamma of your display. I think it's important to gamma correct so that at least you're viewing the images the way that rendrib "expects" them to appear. It can't know about the nonlinearities of your CRT without you telling it. Larry has more on the gamma issue on his own pages. You can find it at http://www.seas.gwu.edu/student/gritz/gamma.html. He also asked me to mention that he got this chart from Greg Ward, but we didn't have any contact information for him. Hopefully he doesn't mind our using it. Readers should note that the image displayed in this article may not provide accurate information for adjusting gamma since your browser may dither the colors in a way which changes what the actual value should be. Also, this image is a JPEG version of the original TIFF image Larry supplied. Its possible the conversion also changed the image. If you're interested in trying this out you should grab the original TIFF image (300x832). |
||||||
 |
Linux Graphics mini-Howto
Unix Graphics Utilities
Linux Multimedia Page
Some of the Mailing Lists and Newsgroups I keep an eye on and where I get alot of the information in this column:
The Gimp User and Gimp Developer Mailing Lists.
The IRTC-L discussion list
comp.graphics.rendering.raytracing
comp.graphics.rendering.renderman
comp.os.linux.announce
More...
|
|
| © 1997 |
|
|
 |
DESCRIPTION OF HOW THIS IMAGE WAS CREATED:
I used this image to learn to use RenderMan and BMRT. I find I like these tools a bit better than POV-Ray, mostly because I can write C code to create models if I want (although I didn't for this particular scene) and the shader language allows a bit more control than POV's. I still have much to learn to make real use of these features, however.
I started with some canned models from 3DCafe: a chair, a couple of bookcases, and some books. I had to convert the chair from 3DS to DXF so I could then import it into AC3D. Once I had it in the modeler, I broke the chair into two pieces - the arm and the rest of the chair. I did this so I could texture them seperately (note that in the 3DS format these pieces may have already been seperate, but after the conversion to DXF they were a single entity). I also sized the chair to be a common unit size and centered it on the origin. This unit size was used on all models so that the real sizing and positioning could be done in the RIB file.
The book case only needed resizing but the books had to be broken into a cover and "text pages". The latter are a single entity that were textured with a matte finish. The covers were textured individually. All the books are basically the same book sized differently and placed in the bookcase from within AC3D. This provided relative positioning for the books in the bookcase, after which any other translations would maintain that relative positioning. Books on the chairs or floor were done similarly.
The walls are simple polygons or bilinear patches. The windowed wall turned out to show problems in the way AC3D does polygons for RIB output. I had to convert this wall from polygons to a set of bilinear patches (see the May issue of the Graphics Muse for how to make a hole in a wall using bilinear patches) in order for the texture to be applied evenly over all of the patches. This problem also showed up when trying to apply texture maps to the chalk board. It apparently has to do with vertex ordering. I had to change the chalkboard to a bilinear patch too. I may have to write my own models for anything that uses texture maps in the future instead of using AC3D. To his credit, I haven't told Andy (AC3D's author) about this yet and he's been very good about addressing any problems I've found in the past.
An important aspect of this image is the tremendous help I got from Larry Gritz, the author of BMRT. He offered some special shaders, although I only used one of them (the one for the ceiling tiles). The biggest help was very constructive criticism and tips for things too look for in my code. For example, he pointed out that I was probably using the parameters to spotlights incorrectly. I was, and it was causing my scene to be very overlit (spotlights use coneangle in radians, and I had specified them in degrees). This one change made a dramatic improvement in the overall image.
All the shaders used, except for the ceiling tiles and the papers on the desks, are from the archive of shaders from Guido Quaroni. This archive includes shaders from the RenderMan Companion by Steve Upstill, from Texturing and Modeling by Ebert, Musgrave, et al, Larry Gritz, and various other places. Its quite a useful resource for novices just getting started with shaders and RenderMan. The papers on the desks are textured with a shader I wrote that creates the horizonatl and vertical lines. It also puts in 3 hole punches, but thats not obvious from the image. This shader is the only one I included in the source [Ed. The IRTC allows the source code for scenes to be uploaded along with the JPEG images and text file]. The chairs are textured with a rusty metallic shader and a displacement shader for the dents. Displacement shaders are cool because they actually move points on the surface (unlike bump maps which just change the normals for those points). The arm surfaces are textured with a wood shader that I made a minor change to (to allow better control of the direction of the wood grain) and a displacement shader that caused the bumpiness, scratches, and chips in the wood. This latter item could have been better, but I was running out of time.
The chalkboard is an image map created in the 0.99.8 developers release of the Gimp. This is a very cool tool for Linux and Unix platforms, very similar to Photoshop (but apparently better, according to people who've used both - I've never used Photoshop myself).
The image out the window is an image map on a simple plane angled away from the window. The window panes are dented using a displacement map. We had windows with bumps in them in High School and thats the effect I was going for here. Its pretty close and as an added benefit it prevents the image outside the window from being too washed out.
The globe on the book shelf is one of those ones that is suspended by magnets. The globe has a displacement map on it as well, which is why, if you look real close, the lighting on it is not smooth where it moves into shadow. The globe and its base were completely modeled in AC3D. It was quick and very easy to do. All the items on the booksshelf by the window are in a single model file, but exported as individual objects so they could be shaded properly. The same is true for the bookcase under the clock.
It was fun. This is certainly the best 3D image I've done to date. Its also the first one of something recognizable (as opposed to space ships and planets no one has ever really seen).
NOTE: One thing I forgot to mention in my original text file for my entry is that I had to edit all the exported RIB files that I created with AC3D to remove the bits of RIB that made each file an independently renderable file. By default AC3D generates a complete scene, one that can be passed to rendrib (the BMRT renderer) directly to render a scene. But what I needed was for the files generated to be only partially complete scenes, without the camera or lighting and so forth. In this way I could use these files in RIB ReadArchive statements, similar to #include files for POV. Considering the number of objects I exported with AC3D, that turned out to be quite a bit of hand editing. I sent email to Andy Colebourne, the author of AC3D, and he's looking into making it possible to output partial RIBs for use as ReadArchive include files.
|
| © 1997 by |
More...
|
BMRT |
 |
| © 1996 |
|
Shading is the process of calculating the color of a pixel from user-specified surface properties and the shading model. Texturing is a method of varying the surface properties from point to point in order to give the appearance of surface detail that is not actually present in the geometry of the surface. [1]A shader is a procedure called by the renderer to apply colors and textures to an object. This can include the surface of objects like block or spheres, the internal space of a solid object, or even the space between objects (the atmosphere). Although based on Peachy's description would imply that shaders only affect the coloring of surfaces (or atmosphere, etc), shaders handle both shading and texturing in the RenderMan environment.
slc myshader.sl AttributeBegin
Color [0.9 0.6 0.6]
Surface "myshader"
ReadArchive "object.rib"
AttributeEnd
This example uses a surface shader (we'll talk about shader types in a moment). The name in double quotes is the name of the shader procedure which is not necessarily the name of the shader source file. Since shaders are procedures they have procedure names. In the above example the procedure name is myshader. This happens to the be same as the base portion (without the suffix) of the shader source filename. The shader compiler doesn't concern itself with the name of the source file, however, other than to know which file to compile. The output filename used for the .so file is the name of the procedure. So if you name your procedure differently than the source file you'll get a differently named compiled .so file. Although this isn't necessarily bad, it does make it a little hard to keep track of your shaders. In any case, the name of the procedure is the name used in the RIB (or C binding) when calling the shader. In the above example, "myshader" is the name of the procedure, not the name of the source file.
The RenderMan Interface specifies six types of shaders, distinguished by the inputs they use and the kinds of output they produce.The text then goes on to describe the following shader types:
Light Source Shaders
Light sources in the RenderMan Shading Language are provided a position and direction and return the color of the light originating from that light and striking the current surface point. The RenderMan specification provides for a set of default light shaders that are very useful and probably cover the most common lighting configurations an average user might encounter. These default shaders include ambient light (the same amount of light thrown in all directions), distant lights (such as the Sun), point lights, spot lights, and area lights. All light sources have an intensity that defines how bright the light shines. Lights can be made to cast shadows or not cast shadows. The more lights that cast shadows you have in a scene the longer it is likely to take to render the final image. During scene design and testing its often advantagous to keep shadows turned off for most lights. When the scene is ready for its final rendering turn the shadows back on.
Ambient light can be used to brighten up a generally dark image but the effect is "fake" and can cause an image to be washed out, losing its realism. Ambient light should be kept small for any scene, say with an intensity of no more than 0.03. Distant lights provide a light that shines in one direction with all rays being parallel. The Sun is the most common example of a distant light source. Stars are also considered distant lights. If a scene is to be lit by sunlight it is often considered a good idea to have distant lights be the only lights to cast shadows. Distant lights do not have position, only direction.
Spot lights are the familiar lights which sit at a particular location in space and shine in one generalized direction covering an area specified by a cone whose tip is the spot light. A spot lights intensity falls off exponentially with the angle from the centerline of the cone. The angle is specified in radians, not degress as with POV-Ray. Specifying the angle in degrees can have the effect of severly over lighting the area covered by the spot light. Point lights also fall off in intensity, but do so with distance from the lights location. A point light shines in all directions at once so does not contain direction but does have position.
Area lights are series of point lights that take on the shape of an object to which they are attached. In this way a the harshness of the shadows cast by a point light can be lessened by creating a larger surface of emitted light. I was not able to learn much about area lights so can't really go into detail on how to use them here.
Most light source shaders use one of two illumination functions: illuminate() and solar(). Both provides ways of integrating light sources on a surface over a finite cone. illuminate() allows for the specification of position for the light source, while solar() is used for light sources that are considered very distant, like the Sun or stars. I consider the writing of light source shaders to be a bit of an advanced topic since the use of the default light source shaders should be sufficient for the novice user to which this article is aimed. Readers should consult The RenderMan Companion and The RenderMan Specification for details on the use of the default shaders.
Surface Shaders
Surface shaders are one of the two types of shaders novice users will make use of most often (the other is displacement shaders). Surface shaders are used to determine the color of light reflected by a given surface point in a particular direction. Surface shaders are used to create wood grains or the colors of an eyeball. They also define the opacity of a surface, ie the amount of light that can pass through a point (the points transparency). A point that is totally opaque allows no light to pass through it, while a point that is completely transparent reflects no light.
The majority of the examples which follow will cover surface shaders. One will be a displacement shader.
Volume Shaders
A volume shader affects light traveling to towards the camera as it passes though and around objects in a scene. Interior volume shaders determine the effect on the light as it passes through an object. Exterior volume shaders affect the light in the "empty space" around an object. Atmospheric shaders handle the space between objects. Exterior and interior volume shaders differ from atmospheric shaders in that the latter operate on all rays originating from the camera (remember that ray tracing traces the lights ray in reverse from nature - from camera to light source). Exterior and interior shaders work only on secondary rays, those rays spawned by the trace() function in shaders. Atmospheric shaders are used for things like fog and mist. Volume shaders are a slightly more advanced topic which I'll try to cover in a future article.
Displacement Shaders
The texture of an object can vary in many ways, from very smooth to very bumpy, from smooth bumps to jagged edges. With ordinary surface shaders a texture can be simulated with the use of a bump map. Bump maps perturb the normal of a point on the surface of an object so that the point appears to be raised, lowered, or otherwised moved from its real location. A bump map describes the variations in a surfaces orientation. Unfortunately, this is only a trick and the surface point is not really moved. For some surfaces this trick works well when viewed from the proper angle. But when seen edge on the surface variations disapper - the edge is smooth. A common example is an orange. With a bump map applied the orange appears to be pitted over its surface. The edge of the sphere, however, is smooth and the pitting effect is lost. This is where displacement shaders come in.
In The RenderMan Interface Specification[3] it says
The displacement shader environment is very similar to a surface shader, except that it only has access to the geometric surface parameters. [A displacement shader] computes a new P [point] and/or a new N [normal for that point].A displacement shader operates across a surface, modifying the physical location of each point. These modifications are generally minor and of a type that would be much more difficult (and computationally expensive) to specify individually. It might be difficult to appreciate this feature until you've seen what it can do. Plate 9 in [4] shows an ordinary cylinder modified with the threads() displacement shader to create the threads on the base of a lightbulb. Figures 1-3 shows a similar (but less sophisticated) example. Without the use of the displacement shader, each thread would have to be made with one ore more individual objects. Even if the computational expense for the added objects were small, the effort required to model these objects correctly would still be significant. Displacement shaders offer procedural control over the shape of an object.
 |
 |
 |
| An ordinary cylinder |
Note that in this case the renderer attributes have not been turned on. The edges of the cylinder are flat, despite the apparent non-flat surface. |
Same cylinder with true displacements In this image the renderer attributes have been turned on. The edges of the cylinder reflect the new shape of the cylinder. |
| Figure 1 | Figure 2 | Figure 3 |
     Attribute "render" "truedisplacement" 1
     Attribute "displacementbound" "coordinatesystem"
               "object" "sphere" 2
The first of these turns on the true displacement attribute so that displacement shaders actually modify the position of a point on the surface. The second specifies how much the bounding box around the object should grow in order to enclose the modified points. How this works is that the attribute tells the renderer how much the bounding box is likely to grow in object space. The renderer can't no before hand how much a shader might modify a surface, so this statement provides a maximum to help the renderer with bounding boxes around displacement mapped objects. Remember that bounding boxes are used help speed up ray-object hit tests by the renderer. Note that you can compute the possible change caused by the displacement in some other space, such as world or camera. Use whatever is convenient. The "sphere" tag lets the renderer know that the bounding box will grow in all directions evenly. Currently BMRT only supports growth in this manner, so no other values should be used here.
Transformation and Imager Shaders
BMRT doesn't support Transformation Shaders (neither does Pixar's PRMan apparently). Apparently transformation shaders are supposed to operate on geometric coordinates to apply "non-linear geometric transformations". According to [5]
The purpose of a transformation shader is to modify a coordinate system.It is used to deform the geometry of a scene without respect to any particular surface. This differs from a displacement shader because the displacement shader operates on a point-by-point basis for a given surface. Transformation shaders modify the current transform, which means they can affect all the objects in a scene.
        surface matte (
                 float Ka = 1;
                 float Kd = 1;
        )
        {
          point Nf;

          /*
           * Calculate the normal which is facing the
           * direction that points towards the camera.
           */
          Nf = faceforward (normalize(N),I);

          Oi = Os;
          Ci = Os * Cs * (Ka * ambient() + Kd * diffuse(Nf));
        }
This is the matte surface shader provided in the BMRT distribution. The matte surface shader happens to be one of a number of required shaders that The RenderMan Interface Specification says a RenderMan compliant renderer must provide.
Shader procedure names
The first thing to notice is the procedure type and name. In this case the shader is a surface shader and its name is "matte". When this code is compiled by slc it will produce a shader called "matte" in a file called "matte.so". Procedure names can be any name that is not a reserved RIB statement. Procedure names may contain letters, numbers and underscores. They may not contain spaces.
Variables and scope
There are a number of different kinds of variables that are used with shaders: Instance variables, global variables, and local variables. Instance variables are the variables used as parameters to the shader. When calling a shader these variables are declared (if they have not already been declared) and assigned a value to be used for that instance of the shader. For example, the matte shader provides two parameters that can have appropriate values specified when the shader is instanced within the RIB file. Lets say we have a sphere for which we will shade using the matte shader. We would specify the instance variables like so:
        AttributeBegin
           Declare "Kd" "float"
           Declare "Ka" "float"
           Surface "matte" "Kd" 0.5 "Ka" 0.5
           Sphere 1 -.5 .5 360
        AttributeEnd
The values specified for Kd and Ks are the instance variables and the renderer will use these values for this instance of the shader. Instance variables are generally known only to the shader upon the initial call for the current instance. Data types and expressions
Shaders have access to only 4 data types: one scalar type, two vector types, and a string type. A string can be defined and used by a shader, but it cannot be modified. So an instance variable that passes in a string value cannot be modified by the shader, nor can a local string variable be modified once it has been defined.
The scaler type used by shaders is called a float type. Shaders must use float variables even for integer calculations. The point type is a a 3 element array of float values which describe a point in some space. By default the point is in world space in BMRT (PRMan uses camera space by default), but it is possible to convert the point to object, world, texture or some other space within the shader. On point can be transformed to a different space using the transform statement. For example:
float y = ycomp(transform("object",P));
will convert the current point to object space and return the Y component of the new point into the float variable y. The other vector type is also a 3 element array of float values that specify a color. A color type variable can be defined as follows:
color Cp = color (0.5, 0.5, 0.5);
Functions
A shader need not be a completely self contained entity. It can call external routines, known as functions. The RenderMan Interface Specificatoin predefines a large number of functions that are available to shader authors using BMRT. The following list is just a sample of these predefined functions:
        #include "rmannotes.sl"

        surface matte (
                 float Ka = 1;
                 float Kd = 1;
        )
        {
          point Nf;
          float fuzz = 0.05
          color Ol;

          /*
           * Calculate the normal which is facing the
           * direction that points towards the camera.
           */
          Nf = faceforward (normalize(N),I);

          Ol = pulse(0.35, 0.65, fuzz, s);
          Oi = Os*Ol;
          Ci = Os * Cs * (Ka * ambient() + Kd * diffuse(Nf));
        }
The actual function is defined in the rmmannotes.sl file as
  #define pulse(a,b,fuzz,x) (smoothstep((a)-(fuzz),(a),(x)) - \
                             smoothstep((b)-(fuzz),(b),(x)))
A shader could just as easily contain the #defined value directly without including another file, but if the function is useful shader authors may wish to keep them in a separate library similar to rmmannotes.sl. In this example, the variable s is the left-to-right component of the current texture coordinate. "s" is a component of the texture space, which we'll cover in the section on coordinate systems. "s" is a global variable which is why it is not defined within the sample code.
Note: This particular example might not be very useful. It is just meant to show how to include functions from a function library.
Functions are only callable by the shader, not directly by the renderer. This means a function cannot be used directly in a RIB file or referenced using the C binding to the RenderMan Interface. Functions cannot be recursive - they cannot call themselves. Also, all variables passed to functions are passed by reference, not by value. It is important to remember this last item so that your function doesn't inadvertantly make changes to variables you were not expecting.
Statements
The shading language provides the following statements for flow control:
Coordinate Systems
There are number of coordinate systems used by RenderMan. Some of these I find easy to understand by themselves, others are more difficult - especially when used within shaders. In a shader, the surface of an object is mapped to a 2 dimensional rectangular grid. This grid runs from coordinates (0,0) in the upper left corner to (1,1) in the lower right corner. The grid is overlayed on the surface, so on a rectangular patch the mapping is obvious. On a sphere the upper corners of the grid map to the same point on the top of the sphere. This grid is known as parameter space and any point in this space is referred to by the global variables u and v. For example, a point on the surface which is in the exact center of the grid would have (u,v) coordinates (.5, .5).
Similar to parameter space is texture space. Texture space is a mapping of a texture map that also runs from 0 to 1, but the variables used for texture space are s and t. By default, texture space is equivalent to parameter space unless either vertex variables (variables applied to vertices of primitive objects like patches or polygons) or the TextureCoordinates statement have modified the texture space of the primitive being shaded. Using the default then, a texture map image would have its upper left corner mapped to the upper left corner of the parameter space grid overlying the objects surface, and the lower right corner of the image would be mapped to the lower right corner of the grid. The image would therefore cover the entire object. Since the texture space does not have to be equivalent to parameter space it would be possible to map an image to only a portion of an object. Unfortunately, I didn't get far enough this month to provide an example of how to do this. Maybe next month.
There are other spaces as well: world space, object space, and shader space. How each of these affects the shading and texturing characteristics is not completely clear to me yet. Shader space is the default space in which shaders operate, but points in shader space can be transformed to world or object space before being operated on. I don't know exactly what this means or why you'd want to do it just yet
One of the most fundamental problem solving techniques is "divide and conquer." That is, break down a complex problem into simpler parts; solve the simpler parts; then combine those parts to solve the original complex problem.The basic structure of a shader is similar to a procedure in C - the shader is declared to be a particular type (surface, displacement, and so forth) and a set of typed parameters are given. Unlike C, however, shader parameters are required to have default values provided. In this way a shader may be instanced without the use of any instance variables. If any of the parameters are specified with instance variables then the value in the instance variable overrides the parameters default value. An minimalist shader might look like the following:In shaders, [we] break down complicated surface patterns and textures into layers. Each layer should be fairly easy to write (if not, then we can break the layer into sub-layers). Then, [we] combine the layers by compositing.
        surface null ()
        {
        }
In fact, this is exactly the definition of the null shader. Don't ask me why such a shader exists. I'm sure the authors of the specification had a reason. I just don't know what it is. Adding a few parameters, we start to see the matte shader forming:
        surface matte (
                 float Ka = 1;
                 float Kd = 1;
        )
        {
        }
The parameters Ka and Kd have their default values provided. Note that Ka is commonly used in the shaders in Guido Quaroni's archive of shaders to represent a scaling factor for ambient light. Similarly, Kd is used to scale diffuse light. These are not global variables, but they are well known variables, much like "i", "j", and "k" are often used as counters in C source code (a throwback to the heady days of Fortran programming). #include "rmannotes.sl"
surface matte (
float Ka = 1;
float Kd = 1;
)
{
point Nf;
float fuzz = 0.05
color Ol;
/*
* Calculate the normal which is facing the
* direction that points towards the camera.
*/
Nf = faceforward (normalize(N),I);
Ol = pulse(0.35, 0.65, fuzz, s);
Oi = Os*Ol;
Ci = Os * Cs * (Ka * ambient() + Kd * diffuse(Nf));
}
Nothing special here. It looks very much like your average C procedure. Now we get into methodologies. May [8] shows us how a layered shader's psuedo-code might look:
        surface banana(...)
        {
          /* background (layer 0) */
          surface_color = yellow-green variations;

          /* layer 1 */
          layer = fibers;
          surface_color = composite layer on surface_color;

          /* layer 2 */
          layer = bruises;
          surface_color = composite layer on surface_color;

          /* layer 3 */
          layer = bites;
          surface_color = composite layer on surface_color;

          /* illumination */
          surface_color = illumination based on surface_color
                          and illum params;

          /* output */
          Ci = surface_color;
        }
What is happening here is that the lowest level applies yellow-and green colors to the surface, after which a second layer has fiber colors composited (blended or overlayed) in. This continues for each of 4 defined layers (0 through 3) plus an illumination calculation to determine the relative brightness of the current point. Finally, the newly computed surface color is ouput via a global variable. Using this sort of methodology makes writing a shader much easier as well as allowing other shader authors to debug and/or extend the shader in the future. A shader file is therefore sort of bottom-up design, where the bottom layers of the surface are calculated first and the topmost layers are computed last.
A colored cross pattern
This example is taken verbatim from RManNotes by Stephen F. May. The shader creates a two color cross pattern. In this example the pattern is applied to a simple plane (a bilinear patch). Take a look at the source code.
        color surface_color, layer_color;
        color surface_opac, layer_opac;
| The first thing you notice is that this shader defines two local color variables: surface_color and layer_color. The layer_color variable is used to compute the current layers color. The surface_color variable is used to composite the various layers of the shader. Two other variables, surface_opacity and layer_opacity, work similarly for the opacity of the current layer. The first layer is a verticle stripe. The shader defines the color for this layer and then determines the opacity for the current point by using a function called pulse(). This is a function provided by May in his "rmannotes.sl" function library. The pulse() function allows the edges of the stripes in this shader to flow smoothly from one color to another (take a look at the edges of the stripes in the sample image). pulse() uses the fuzz variable to determine how fuzzy the edges will be. Finaly, for each layer the layers color and opacity are blended together to get the new surface color. The blend() function is also part of rmannotes.sl and is an extension of the RenderMan Interface's mix() function, which mixes color and opacity values. |
|
        Oi = surface_opac;
        Ci = surface_opac * surface_color;
These two values are used by the renderer to compute pixel values in the output image.
Adding opacity - a wireframe shader
This example is taken from the RenderMan Companion. It shows how a shader can be used to cut out portions of a solid surface. We use the first example as a backdrop for a sphere that is shaded with the screen() shader from the RenderMan Companion text (the name of the shader as used here is slightly different because it is taken from the collection of shaders from Guido Quaroni, who changed the names of some shaders to reflect their origins). First lets look at the sceen using the "plastic" shader (which comes as a default shader in the BRMT distribution). Figure 5 shows how this scene renders. The sphere is solid in this example. The RIB code for this contains the following lines:
        AttributeBegin
           Color [ 1.0 0.5 0.5 ]
           Surface "plastic"
           Sphere 1 -1 1 360
        AttributeEnd
In Figure 6 the sphere has been changed to a wireframe surface. The only difference between this scene and Figure 5 is the surface shader used. For Figure 6 the rib code looks like this:
        AttributeBegin
           Color [ 1.0 0.5 0.5 ]
           Surface "RCScreen"
           Sphere 1 -1 1 360
        AttributeEnd
The rest of the RIBs are exactly the same. Now lets look at the screen() shader code.
surface
RCScreen(
  float Ks   = .5,
  Kd         = .5,
  Ka         = .1,
  roughness  = .1,
  density    = .25,
  frequency  = 20;
  color specularcolor = color (1,1,1) )
{
   varying point Nf =
           faceforward( normalize(N), I );

   point V = normalize(-I);
|
|
   if( mod(s*frequency,1) < density ||
       mod(t*frequency,1) < density )
      Oi = 1.0;
   else
      Oi = 0.0;
   Ci = Oi * ( Cs * ( Ka*ambient() + Kd*diffuse(Nf) ) +
               specularcolor*Ks* specular(Nf,V,roughness));
}
A simple paper shader
While working on my entry for the March/April 1997 round of the IRTC I wrote my first shader - a shader to simulate 3 holed notebook paper. This simplistic shader offers some of the characteristics of the previous examples in producing regularly spaced horizontal and verticle lines plus the added feature of fully transparent circular regions that are positioned by instance variables. We start by defining the parameters needed by the shader. There are quite a few more parameters than the other shaders. The reason for this is that this shader works on features which are not quite so symmetrical. You can also probably chalk it up to my inexperience.
   color hcolor       = color "rgb" (0, 0, 1);
   color vcolor       = color "rgb" (1, 0, 0);
   float hfreq        = 34;
   float vfreq        = 6;
   float skip         = 4;
   float paper_height = 11;
   float paper_width  = 8.5;
   float density      = .03125;
   float holeoffset   = .09325;
   float holeradius   = .01975;
   float hole1        = 2.6;
   float hole2        = 18;
   float hole3        = 31.25;
The colors of the horizontal and vertical lines come first. There are, by default, 34 lines on the paper with the first 4 "skipped" to give the small header space at the top of the paper. The vertical frequency is used to divide the paper in n equal vertical blocks across the page. This is used to determine the location of the single verticle stripe. We'll look at this again in a moment.
surface_color = Cs;This line simply initializes a local variable to the current color of the surface. We'll use this value in computing a new surface color based on whether the point is on a horizontal or vertical line. /*
* Layer 1 - horizontal stripes.
* There is one stripe for every
* horizontal block. The stripe is
* "density" thick and starts at the top of
* each block, except for the first "skip"
* blocks.
*/
tt = t*paper_height;
for ( horiz=skip; horiz<hfreq; horiz=horiz+1 )
{
min = horiz*hblock;
max = min+density;
val = smoothstep(min, max, tt);
if ( val != 0 && val != 1 )
surface_color = mix(hcolor, Cs, val);
}
This loop runs through all the horizontal blocks on the paper (defined by the hfreq parameter) and determines if the point lies between the top of the block and the top of the block plus the width of a horizontal line (specified with the density parameter).
|
|
   min = horiz*hblock;
   max = min+density;
   val = smoothstep(min, max, tt);
   if ( val != 0 && val != 1 )
      surface_color = val*hcolor;
Alternatively, the line color could be used on its own, without combining it with the value returned from the smooth step. This gives a very jagged line, but the line is much darker even when used with smaller line densities. The result from using the line color alone (with a smaller line density) can be seen in Figure 9.
   /* Layer 2 - vertical stripe */
   ss = s*paper_width;
   min = vblock;
   max = min+density;
   val = smoothstep(min, max, ss);
   if ( val != 0 && val != 1 )
      surface_color = mix(vcolor, Cs, val);
This next bit of code does exactly the same as the previous code except it operates on the vertical line. Since there is only one verticle line there is no need to check every vertical block, only the one which will contain the visible stripe (which is specified with the vblock parameter).shole = holeoffset*paper_width; ss = s*paper_height; tt = t*paper_height; pos = (ss,tt,0);Note that we use the papers height for converting the ss,tt variables into the scale of the paper width and height. Why? Because if we used the width for ss we would end up with eliptical holes. There is probably a better way to deal with this problem (of making the holes circular) but this method worked for me.
   /* First Hole */
   thole = hole1*hblock;
   hpos  = (shole, thole, 0);
   Oi = filterstep (holeradius*paper_width,
                     distance(pos,hpos));

   /* Second Hole */
   thole = hole2*hblock;
   hpos = (shole, thole, 0);
   Oi *= filterstep (holeradius*paper_width,
                      distance(pos,hpos));

   /* Third Hole */
   thole = hole3*hblock;
   hpos = (shole, thole, 0);
   Oi *= filterstep (holeradius*paper_width,
                      distance(pos,hpos));
Filterstep is, again, a standard function in the RenderMan specification. However, this function was not documented by either the RenderMan Interface Specification or the RenderMan Companion. According to Larry Gritz
The filterstep() function is identical to step, except that it is analytically antialiased. Similar to the texture() function, filterstep actually takes the derivative of its second argument, and "fades in" at a rate dependent on how fast that variable is changing. In technical terms, it returns the convolution of the step function with a filter whose width is about the size of a pixel. So, no jaggies.Thus, using filterstep() helped to antialias the edges of the holes (although its not that obvious from such a small image given in Figures 8 and 9). I didn't try it, but I bet filterstep() could probably be used to fix the problems with the horizontal and vertical lines.
A textured mapped chalkboard
This simple texture map example is used in my Post Detention image which I entered in the March/April 1997 IRTC. The actual shader is taken from the archive collection by Guido Quaroni, and the shader originally comes from Larry Knott (who I presume works at Pixar). I didn't add an image of this since all you would see would be the original image mapped on a flat plane, which really doesn't show anything useful. If you want to take a look at the chalkboard in a complete scene, take a look at the companion article in this months Graphics Muse column.
Like the other shader examples, this one is fairly straightforward. An image filename is passed in the texturename parameter. Note that image files must be TIFF files for use with BMRT. The texture coordinates are used to grab a value from the image file which is then combined with the ambient and diffuse lighting for the incident ray. If a specular highlight has been specified (which it is by default in the Ks parameter) then a specular highlight is added to the incident ray. Finally, the output value, Ci, is combined with the surfaces opacity for the final color to be used by the current surface point.
Displacement map example
We've already seen an example of displacement maps using the threads() shader. Lets take a quick look at the shader code:
   magnitude = (sin( PI*2*(t*frequency +
                     s + phase))+offset) * Km;
Here, the displacement of the surface point is determined by using a phased sinusoidal. The t variable determines the position lengthwise across the surface and s is used to cause the spiraling effect. The next bit of code
   if( t > (1-dampzone))
      magnitude *= (1.0-t) / dampzone;
   else if( t < dampzone )
      magnitude *= t / dampzone;
causes the ends of the surface, in our case a cylinder, to revert to the original shape. For our example that means this forces the shader to leave the ends circular. This helps to keep the object that has been threaded in a shape that is easily joined to other objects. In the RenderMan Companion, the threaded cylinder is joined to a glass bulb to form a light bulb. Finally, the last two lines
   P += normalize(N) * magnitude;
   N = calculatenormal(P);
cause the point to be moved and the normal for the new point to be calculated. In this way the point visually appears to have moved, which indeed it has.
Next month I planned on doing the 3rd part of this 3 part BMRT series. I think taking 2 months between articles worked well for me this time since it allowed me a little more time to dig deeper. Plan on the final article on BMRT in this series in the July issue of the Graphics Muse. Till then, happy rendering.
|
|
| © 1996 by |
Kandinski is my new pre-pre-pre-beta program which generates a picture file from a MIDI file. It does so based on my cycluphonic method of correlating colors to musical pitches. The few careful observers who have seen previous implementations of cycluphonics agree that it gives visual events which seem to sympathize with the generating music, in terms of implied feeling, better than previous "color organ" methods. Kandinski was written with pfe under Linux on a 486. It should be easy to port to another ANSI Forth system, as I am rusty at Forth, and the task at hand didn't call for any trickery, and I avoided the Linux-specific stuff in pfe, mostly because I couldn't find much documentation on it. The code presented here creates a .ppm image file on a selectable track by track basis. The piano envelope option is not implemented yet, just organ. .ppm files can be converted to just about any image format with the unix pbmplus tools, and are viewable in Linux with zgv. The crucial cycluphonic element in Kandinski is the "cycle" construct, a lookup table which Kandinski uses to map a 12 hue color wheel to the Cycle of Fifths. That's the crux of cycluphonics. If you use this code, or cycluphonics, give credit where due.
( kandinski   )
( ANSI Forth sourcecode    Rick Hohensee    begun 199703  )
( A MIDIfile-to-still-picture implementation of my  Cycluphonic method
       of correlating colors and musical pitches. )
( used i486 Slackware Linux from the InfoMagic LDR sept 96, pfe,
      Jeff Glatt's    MIDI docs, dpans7    )
(   redistribution permission contingent on authorship credit   )

( default number base of file is.... ) decimal

( app notes, pfe file-postition is a DOUBLE!
            MIDI sizes are SINGLEs
            YEESH!  "f0" is a variable!   AAAAARRRRGGG!!!
            hex f0 decimal .      doesn't work as wished.      )


( my prefered tools, jigs and cheats )

: binary decimal 2   base !      ;

: .base base @ dup decimal . base !     ;


: walk ."             " key drop     ;

: 0s (   wipe data stack )
    depth dup if 0 do drop loop else drop then     ;

: paddump ( [  count ---  ]        counted dump from pad )
       pad swap dump    ;


(  app related ....)

0 value deltasum
2variable trkend   0 0 trkend 2!

0 value dpp  ( deltas per pixel )
create rgbs 640 3 * allot
0 value trk#
variable midifile
0 value pbmfile

create organstate 128 allot
organstate 128 0 fill  ( pfe allot leaves an "allot" string in the alloted
                               space )
create 12state 12 allot
12state 12 0 fill

0 value redac
0 value greenac
0 value blueac
0 value backfoot

create cycle 0 , 7 , 2 , 9 , 4 , 11 , 6 , 1 , 8 , 3 , 10 , 5 ,

create wheelred 12 allot
255 c, 255 c, 255 c, 127 c, 0 c, 0 c, 0 c, 0 c, 0 c, 127 c, 255 c, 255 c,
create wheelgreen 12 allot
0 c, 127 c, 255 c, 255 c, 255 c, 255 c, 255 c, 127 c, 0 c, 0 c, 0 c, 0 c,
create wheelblue 12 allot
0 c, 0 c, 0 c, 0 c, 0 c, 127 c, 255 c, 255 c, 255 c, 255 c, 255 c, 127 c,


0 value fid

create ppm
ascii P c, ascii 6 c, 10 c, ascii 6 c, ascii 4 c, ascii 0 c,
bl c, ascii 8 c, ascii 0 c,
bl c, ascii 2 c, ascii 5 c, ascii 5 c,


: msboff 127 and ;

: openin  ( opens a file called in.mid in current dir
            which can then be referenced via    midifile @ )
    S" in.mid" r/w bin open-file drop midifile !        ;

: in.mid ( --- fid_of_in.mid ) ( poorly factored, ) midifile @      ;

: inpos ( ---  2inpos ) ( get file position in in.mid )
     midifile @  file-position drop ( ior)      ;

: inpeek  ( [  count --- ]        counted read from in.mid to pad )
        pad swap
        midifile @ read-file drop     ;

: trksize (  --- trksize ) ( DOES move inpos )
     ( build a 32 bit track size cell from the WRONGendian value
       , from body0 to body0 )
     4 inpeek  drop     ( endianism translation )
     pad c@ 24 lshift
     pad 1 + c@ 16 lshift +
     pad 2 + c@ 8  lshift +
     pad 3 + c@ +                ;

2variable prevpos
2variable starttrk 0 0 starttrk 2!

: filebound ( fid --- 0 if inside file )
      dup >r file-position  drop r> file-size drop  2swap d< ;

: hoptrk ( [ --- inbounds_flag ] body0 to next trk body0 )
    trksize 8 + 0 inpos d+ in.mid reposition-file drop
    in.mid  filebound            ;

0 value envelope
0 value noteons 0 value noteoffs

: hinybble 240 and ;  ( f0 is a &$^%##%$ variable name! )
hex
0f constant lonybble
binary
: bit7 10000000 and ;
decimal

0 value delta

: bytein pad 1 in.mid read-file drop
1 <> if ( error) cr
." end of in.mid  "
    quit  else pad c@ then    ;

: bignum 0
begin bytein dup bit7
while
  msboff swap 7 lshift +
repeat
swap 7 lshift + ;

: ignore ( n --- ) ( add n to inpos )
0  inpos  d+ in.mid reposition-file drop     ;

: ignoreto ( delimiter --- ) ( ignore filebytes to delimiter )
 begin dup bytein = until  drop     ;

0 value moment

: mthd   ( --- da position of MThD or fail )
77 ignoreto 84 ignoreto 104 ignoreto 100 ignoreto inpos      ;

: mtrk 77 ignoreto  84 ignoreto 114 ignoreto 107 ignoreto inpos     ;

: seed
." hit a key please " key
time&date 2drop drop + + + in.mid + ;


: 128to12 ( organstate to 12state, i.e. midinote#s to notename#s )
12state 12 0 fill
128 0 do
   organstate i + c@  if
     1 i 12 mod 12state + c!
   then ( simple for now )
loop
;

: 12torgb 0 to redac  0 to  greenac  0 to blueac
12 0 do
   12state i + c@ if
      i cells cycle + @
      cells dup wheelred + @ redac  + 2 / to redac
      dup wheelgreen + @ greenac + 2 / to greenac
      wheelblue + @ blueac  + 2 / to blueac
   then
loop  ;


: orgtorgb ( pixel# --- )
128to12
12torgb
dup redac swap 3 * rgbs + c!
dup greenac swap  3 * 1 + rgbs + c!
blueac swap  3 * 2 + rgbs + c!
;


: reset (  --- )  (  actions on an   FF status byte  )
bytein case
  0 of bignum ignore ." ff 00 ignored "  endof
  1 of ." text     "           bignum ignore        endof
  2 of ." copyright     "      bignum ignore  endof
  3 of ."  trackname       "   bignum ignore   endof
  4 of ." inst name   "        bignum ignore     endof
  5 of ." lyric    "           bignum ignore      endof
  6 of ." flow marker   "      bignum ignore  endof
  7 of ." cue point, sample "  bignum ignore  endof
  33 of 2 ignore   ( port # )                         endof
  47 of ( ." last event of track   " ) 1 ignore       endof
  81 of  4 ignore                                     endof
  84 of 6 ignore ." smte o/s ignored "                endof
  88 of 5 ignore ( time sig )                         endof
   (  ."       unknown reset ff thang               "  )
endcase          ;

: sysex ( sysexbyte ---       ) ( i.e. message with status hinyb of f )
dup case
  240 of      247 ignoreto  ." ignoring f0 to f7      "     drop  endof
  241 of ." miditimecode, unsupported  "  drop          endof
  242 of ."  song position pointer     "  drop          endof
  243 of ."  song select               "  drop          endof
  244 of ."  unimplemented f4 sysex     "  drop         endof
  245 of ."  unimplemented f5 sysex    "  drop          endof
  246 of ."  tune calibrate            "  drop          endof
  249 of ."  unimplemented f9 sysex     "  drop         endof
  247 of ."  discontinue f0/240 stream  "  drop         endof
  248 of ."  midi clock                 "  drop         endof
  250 of ."  restart song               "  drop         endof
  251 of ."  midi continue, flow        "  drop         endof
  252 of ."  stop                       "  drop         endof
  254 of ."  active sense message       "  drop         endof
  253 of ."  unimplemented fd sysex     "  drop         endof
  255 of        reset                   endof
   ." impossible sysex     "
endcase      ;

: envelope? cr ." piano envelope or organ? (p=piano/other=organ) " key
ascii p = if -1 to envelope else 0 to envelope then ;

: message   ( survey pass )
bytein dup hinybble  case
   128 of 2 ignore   noteoffs 1 + to noteoffs  drop endof
   144 of  noteons  1+ to noteons   2 ignore drop endof
   160 of 2 ignore drop   endof
   176 of 2 ignore drop   endof
   192 of 2 ignore drop   endof
   208 of 2 ignore drop   endof
   224 of 2 ignore drop   endof
   240 of cr  sysex           endof

endcase     ;

: pianooff ." pianooff " 2 ignore ;
: pianoon  2 ignore ;
: organoff 0  organstate bytein +  c!  1 ignore   ;
: organon  -1  organstate bytein +  c! 1 ignore   ;

: messageagain   ( processing pass )
bytein dup hinybble  case
   128 of envelope if pianooff else organoff then drop endof
   144 of envelope if pianoon else organon then  drop endof
   160 of 2 ignore drop   endof
   176 of 2 ignore drop   endof
   192 of 2 ignore drop   endof
   208 of 2 ignore drop   endof
   224 of 2 ignore drop   endof
   240 of cr  sysex           endof

endcase     ;


: random.kan ( create file[name] kan[random].ppm )
seed srand
ascii k pad  c! ascii a pad 1 + c!   ascii n pad 2 + c!
8 3 do 26 random 97 + i pad + c! loop
    ascii . pad 8 + c! ascii p pad 9 + c! ascii p pad 10 + c!
    ascii m pad 11 + c!      ;

: makepic
random.kan
pad 12 r/w create-file drop to pbmfile  ( new filename exists )
ppm 16 pbmfile write-file drop
80 0 do
rgbs 640 3 * pbmfile write-file drop
loop
;

: process
0 to deltasum 0 to noteons 0 to noteoffs
640 0 do ( i=pixel )

   begin
     (  bignum backfoot   )
     bignum deltasum + to deltasum
     messageagain
     i dpp *  deltasum >
   while
   repeat
   (  paint pixel  )

   i orgtorgb
loop
makepic
;


: survey (  a track )
inpos  starttrk 2!
trksize 0  inpos d+ trkend 2!
0 to deltasum 0 to noteons 0 to noteoffs
begin
   bignum deltasum + to deltasum
   message
   inpos trkend 2@ d<
while
repeat
;

: track survey
noteons if ." This track has notes....    "
   cr ."  noteons " noteons .  ."     noteoffs " noteoffs .
   ."     MIDI clocks per pixel " deltasum 640 / dup to dpp .
   cr   ." wanna do a pic of this track? (y/other) "  key ascii y = if
envelope?
starttrk 2@ in.mid reposition-file drop inpos d. walk
noteons     .      dpp if
process else ."  less than one clock per pixel, no can do " walk then
then then
   ;

: typecheck
   mthd
inpos 2dup 4 0 d= if ." apparent std MIDI seq file. Yay.    "
else 16 0 d= if ." apparent RMID MIDI file.  OK.    " else
cr  ." in.mid is apparently not a MIDI file "  cr
." Copy MIDI file to be processed to in.mid   " bye then then       ;

: main        0 to trk#
openin  typecheck
begin
   trk# 1 + dup to trk#

   mtrk
   track
   ( bytein does a QUIT on end-of-file )
again
;
Separate documentation file for the Kandinski program Rick Hohensee http://cqi.com/~humbubba or please cc to
"Well, should we get one pitcher or two?" That was the question that began the first unofficial event of the Linux Expo Thursday night. A group of people, including Red Hat employees, some of the speakers and a tired maddog were at the Carolina Brewery in Chapel Hill, North Carolina. It was late, and I was the last person to arrive."Two pitchers," I cried,"Now what will you be drinking?"
The next day, Friday April 4th started early, as I had to set up the Linux International booth, as well as absorb all that was happening. The event was held in the North Carolina Biotechnology Center at Research Triangle Park. As I approached the Biotech Center, I was met with a friendly parking coordinator that reinforced the information that "parking was scarce", and that most people had to park at outlying lots. Fortunately Red Hat had arranged for shuttle busses from those lots and from several of the hotels. Since our car had an exhibitor's pass, we were able to park close to the Biotech Center and unload our banners, handouts and stuffed penguins.
There was a large tent to the left outside of the building containing the "Linux Expo Super Store" stocked with Linux books, Linux bumper stickers, T-shirts (including an excellently designed Expo shirt that said "Expose yourself to Linux" with a front and rear view of a penguin holding open an overcoat) and other interesting souvenir items. Further to the left was an outdoor viewing area for the conference talks that (due to the excellent weather) was a favorite spot for people to view the technical talks for free, especially while playing Frisbee. A raffle was held in the registration area, and prizes were given away on an hourly basis. Having registered, attendees were given a copy of the talks as well as an event schedule.
The event was held on two floors with the exhibits spread out on both. There was another conference viewing area inside the building with TV monitors, as well as the conference auditorium itself. There was an Install Fest area (sponsored by the Washington D.C. Linux User's Group, Linux Hardware Solutions and Red Hat Software), where people brought their systems, received help with installing Red Hat's latest release, and Olaf Kirch's kernel-based NFS server was "stress tested" at the same time. Finally, there was a food court area, where people could buy sandwiches, chips, soda and other "software development food".
There were fifteen vendors at the Expo, each with "table-top" booths to display their wares. I prefer the "pipe-and-drape" approach to trade shows rather than expensive booths, since I would rather the vendors put more money into development of the product and less into elaborate displays or floor shows with unicycle riders who juggle things. While not all Linux vendors were at Linux Expo, a wide spectrum of companies, including Linux International, Cyclades, Numerical Algorithms Group, Linux Hardware Solutions, Enhanced Software Technologies, Caldera, Applix, Xess, WorkGroup Solutions, Stay Online, VA Research, Apex Systems Integration, PromoX Systems and (of course) Red Hat Software were present. One item being demonstrated at the Linux Hardware Solutions booth was a free piece of software called [cw]em86[ecw] that allowed an Intel/Linux binary to run without change on an Alpha/Linux system. Being shown for the first time, it allowed Applixware, Netscape and various other applications to execute as if they had been ported to the system.
Penguins abounded in various T-shirts, giveaways and objects d'art. In fact, there were so many people there (I estimated 900 over the two-day event) with penguin "stuff", that I thought I'd had enough of penguins; but afterwards while wandering around Chapel Hill, Alan Cox found some candy in the shape of penguins, so penguin "lust" started all over again.
The technical conference started off with a presentation by Gilbert Coville of Apple Computer with a talk about the MkLinux kernel. For people who were afraid that this would turn into a "Red Hat Only" event, it was interesting that Gilbert's talk opened the Expo and that a talk about the Debian Linux Distribution (given by Bruce Perens) followed shortly after. Bruce also discussed the graphics used in the making of Toy Story in a separate presentation.
Various presentations about hardware-specific ports were given. Dave Miller talked about the "Next Generation SPARCLinux" as well as the Free Software Development Model, and David Mosberger-Tang talked about the Alpha Port, as well as methods, applicable to both Intel and Alpha, for speeding up your programs by paying attention to memory and cache accesses.
Other talks were more general across the Linux OS, such as Jeff Uphoff's "Network File Locking", Alan Cox's "Tour of the Linux Networking Stack", Peter Braam's "Coda Filesystem", Alexander Yuriev's talk on the IPv4 family of protocols and infrastructure and his talk on security, Michael Callahan's "Linux and Legacy LANs", Eric Youngdale's "Beyond ELF", Olaf Kirch's "Linux Network File System", Theodore Ts's "Ext2 File System: Design, Implementation and the Future", Miguel de Icaza's talk on the new RAID code and Daniel Quinlan's talk on the File System Hierarchy Standard.
To round out the list of talks and events was Dr. Greg Wettstein's talk on "Working and Playing with others: Linux Grows Up" and the Linux Bowl.
The Linux Bowl was the final event. Two teams of six developers were pitted against each other to answer thirty questions about Linux and the Linux community. Questions ranged from "What liquid should one drink between rounds of a Finnish sauna?" (correct answer: beer) to "What version library fixed a particular security hole?" to which Alan Cox gave a (seemingly) ten minute answer. While some of the questions were very obscure (even the moderator was unsure of the answer), most of the time either the right answer (or a good facsimile) was given.
The show sponsors (after tallying up the attendence) reported that 958 people showed up, which could be the largest Linux-specific event ever, of which 40% were from within North Carolina. Attendees came from over 25 states, 4 Canadian provinces, and 10 countries, including Australia, Korea and European countries.
Finally, I would like to thank the members of the Atlanta Linux Enthusiasts http://www.ale.org/ group who helped to staff the Linux International booth. They were great and helped give me the freedom to get out from behind the booth every once in a while, because most importantly, Linux Expo was a chance to talk with the vendors, the developers and other old and new friends on a one-to-one, quality basis. Perhaps some things could be improved for next year: A larger auditorium for the talks, more and closer parking and less expensive food in the food court. But certainly the southern hospitality and warmth of Red Hat Software came through. I want to thank the sponsors for arranging a great event, and I hope that next year's will be even larger and better.
Most of the window-managers available for Linux these days can trace their ancestry back to the original twm program, which may have been the first widely used manager on unix systems. There is a good reason for this, as twm pioneered many of the features taken for granted by users, such as movable, resizable windows and a root-window applications menu. It's good, time-tested code; why reinvent the wheel?
Two programmers have recently done just that, from two perspectives as far removed from each other as their respective geographical locations. Chris Cannam, a British programmer, has taken the minimalist approach with his wm2 manager (which I wrote about in LG #14) and the new wm2 variant wmx, which I discuss elsewhere in this issue.
At the other extreme is the work of a young Australian programmer who likes to be known as the Rasterman. Imagine asking the programmers responsible for the games Quake or Duke Nukem 3D to write a window-manager; the result might bear some resemblance to the fanciful program known as Enlightenment.
I first encountered Enlightenment (what a name! it seems to carry the implication that we users of fvwm et al are still crawling blindly through the primordial ooze...) earlier this year, when a binary was available on the web. I tried it briefly, but at the time I had a 486 machine; it ran slowly for me and seemed to consume great gobs of memory. Recently the Rasterman (his real name is Carsten Haitzler) has rewritten the application from scratch, tightening it up and introducing a new shared lib which handles image loading and rescaling. The memory consumption has been greatly reduced since the initial release. At this point (beta release 4) there are no virtual desktops or root-window menus, but the project looks promising and what there is of it runs well for me.
Enlightenment uses the ppm image format for both window details and icons. An elaborate configuration file (called windowstyles) specifies which image goes where. Each segment of the window border and detailing is a separate ppm file. I haven't made any attempt to modify the default configuration. It looks like it would take many hours to write a new one. Carsten plans on eventually offering configurations which would emulate any of the other window-managers.
I get the impression from the Enlightenment web-page that the ppm format is more efficient than others, especially on 16-32 bit displays. I don't know how valid this is, but the window-manager does seem to do quite a bit of image handling without consuming great amounts of memory.
This window-manager automatically will load any sort of image format as a root background image. At startup the appropriate netpbm utility is summoned to transform the image to the ppm format. Naturally, you need to have the netpbm graphics utility package installed for this to work.
Here is a screenshot of a window under Enlightenment:

XV (with which I made the screenshot) couldn't figure out where the actual window border was; can you blame it? I set the root-window background to be the same color as this HTML-file background as a quick work-around.
The Enlightenment web-site is at http://www.cse.unsw.edu.au/~s2154962/enlightenment/index.html. The source for the latest version can be downloaded from the site; the latest news about the application will also be there.
It will be interesting to see what eventually happens with Enlightenment, though personally I'm satisfied with the window-managers I currently use. I just like to see diversity in software for Linux. Fancy new window-borders might seem to be a trivial matter but it is user-interface features such as these which can attract new users, especially younger ones. I showed Enlightenment to my sixteen-year-old son (an avid computer- game player) and he was impressed. His comment was "It looks like a game interface!".
Another factor is the simple human desire for novelty. Sometimes the same old interface becomes boring -- you realize you aren't really even seeing it anymore. A change in background and window-style can be refreshing. People routinely change room interiors for these same reasons and, come to think of it, I look at my computer screen quite a bit more than I do the walls!
Keep in mind that the science-fiction Bladerunneresque appearance is just the default. Enlightenment is a framework and could be configured in a variety of ways, depending upon taste (and how much time you're willing to spend!). Luckily (if you have patience), someone will eventually come up with a configuration which will suit you. or at least be close. Interest seems to be growing in this window-manager lately (judging by the volume of messages in the mailing list) and it may yet evolve into a community-supported window-manager, such as Fvwm2 or Afterstep. It's been released under the Gnu license, but so far Carsten Haitzler is the sole developer.
Around 1993 Kevin Burfitt, an Australian computer science student, began developing a computer program which would transform recorded music into moving colored patterns. Programs such as this had been in use for some time, typically as an adjunct to a rock concert, i.e. part of the "light show". This program was originally written for DOS, though before long it began to acquire a trait common to software in the unix world: a multitude of options and parameters.
Kevin must be a fan of the early 20th-century horror writer H.P. Lovecraft. How else to account for the distinctive appellation "Cthugha" which he gave his program? In the Lovecraft stories Cthugha is the name given to a horrific "elder god" which manifested itself to humans in the form of shifting colored lights. (This doesn't sound too horrific, but Lovecraft could make a loaf of bread seem sinister!)
Cthugha has from the early days been available under the aegis of the Gnu General Public License, making the source freely available. This opened the door for many other programmers scattered throughout the world who became involved with the project. Sound familiar? Ports of the program are now available for the PowerMac, Win95 (in development), and of course Linux. is responsible for the Linux port. He recently released a new version (0.9) which is available from the following sites:
The input to the program can be any audio source, such as a microphone, a CDROM drive (though you must have the drive connected to your soundcard), or even a sound file. Cthugha takes the digital audio information and, after passing the data stream through any combination of filters, displays it to the screen in real time. The keyboard is used to change the various parameters either specifically or randomly. The simplest displays resemble the screen of an oscilloscope being fed audio data (Cthugha has been called "an oscilloscope on acid") but as more optional filters are added the display becomes baroquely intricate. If too many filters are active the resulting images can be chaotic, with little discernible relation to the sound being processed.
The Linux version of Cthugha is compiled into two executables: cthugha, which is a console application (using Svgalib), and xcthugha, which runs either in an X-window or as a full-screen X application using the new DGA extensions. This last requires XFree86 3.2 or later. Xcthugha can also be run as a screensaver; in former releases this was a separate executable.
In this release the X11 version runs faster and smoother than in earlier releases, but I still prefer the console version. It's the quickest and most responsive of the three interfaces and (in my experience) the only usable version on a machine less powerful than a mid-range Pentium.
Running Cthugha reminds me of playing a musical instrument. The first attempts aren't consistently pleasant, but with practice a measure of control is gained. Orchestral or loud rock music can benefit from low gain settings, which help to produce a non-chaotic display. The good sort of recording to start with is music with few voices or tracks. A vocalist with minimal accompaniment or solo instrumental music give good results while you gain a feel for the program.
Cthugha comes with several "translation tables"; these are filters which map the display to various moving patterns, such as spirals or the appearance of traveling through a starfield. I don't use them much, as it seems to me they obscure the relationship between the music and the display. The tables also tend to increase CPU usage. Try them and see what you think, as they seem to be popular with other Cthugha users.
The other filter categories are more useful. The "wave" filters control the general shape of the sound waves. These run the gamut from basic oscilloscope sine and square waves to angular lightning-like patterns or floating clusters of fire-flies. The "flame" filters add to the waves trailing clouds of glory (I've always wanted to use that phrase in a non-ironic sense!).
Using a microphone as input is fun, especially if there are kids around. Seeing your voice represented as billowing clouds of iridescent plasma is novel, to say the least. Various musical instruments are interesting to try as well; if one person plays the instrument while the other keys in parameters, a combination which seems to reflect the character of the melody can often be found. If you should happen upon a combination of settings which results in a particularly pleasing screen just press the a key and those settings are entered into your Cthugha initialization file.
Another option is the Fast Fourier Transform, an algorithm which gives an entirely different look to the sound; it's hard to describe, but FFT seems more three-dimensional and subtle. The sampling rate should be reduced to 22000 hz. (from the default of 44000 hz.) since FFT adds one more level of computation to the sound-translation process.
Kevin Burfitt's decision to use the Fractint 256-color palette file as the Cthugha palette file format was fortuitous. Over the years Fractint users have come up with a multitude of palette files among which can be found palettes to please anyone's taste. The Fractint fractal generator includes a handy palette-file editor which can be used to create or modify palettes for Cthugha. I'm not sure if the palette editor is included with Xfractint -- I mostly use the DOS Fractint in a Dosemu console session.
Here are a couple of screen-shots of xcthugha running in a 320x200 window:


These are snapshots, of course, and show little of the dynamic quality of Cthugha reacting to the music. The above images, by the way, are of an old recording of Sarah Vaughan singing with piano accompaniment.
Last modified: Sun 27 Apr 1997
After I finish these Gazette articles and get them uploaded to SSC, I can usually count on a URL changing or a newer version of a program being released. Sometimes that very day! The Gazette readers are also quick to let me know of any factual errors I've made. I've accumulated several of these corrections and updates and shall present them here.
Last month I wrote a short piece about GV, a new Postscript file viewer. I received a letter from the maintainer of the Debian GV package:
       Hello Larry!

       I enjoyed reading your article, but there are two remarks I want to
       make:

       - Your screen capture is one of the one modified gv that works with
       all Athena Widgets, including the standard one. These modifications
       were made by me (although it wasn't very hard once I realized how
       well Johannes separated the Xaw3d stuff from the rest).
       It would have been better to have a screen capture using libXaw3d, as
       that is the standard look and feel. The last statement about having
       to have Xaw3d is not very convincing this way.
      - There is a gv homepage now:

                    http://wwwthep.physik.uni-mainz.de/~plass/gv/

      This page currently features gv version 3, which can no longer be
       used without libXaw3d. The last version of gv supporting standard
       Xaw was 2.9.4 which will soon be available on a debian archive site.
       Version 3 is even better than version 2 with respect to look and feel
       (one of the first really convincing applications using Xaw3d, IMO)
       and an improved postscript scanner.

      While I'm sure that it isn't possible to change/add to the article,
      there could be a short notice in the next gazette.

              Helmut

      --
      Helmut Geyer                                Helmut.Geyer@iwr.uni-heidelberg.de
      public PGP key available :           finger geyer@saturn.iwr.uni-heidelberg.de
FileRunner has been updated several times since I reviewed it several months ago. The latest version, 2.3, has improved FTP capabilities (including the option of downloading files with a separate background process). I must confess I'm addicted to this file-manager. Once you get the hang of it file manipulation and directory traversals become so speedy that using it as root can be risky! Check the FileRunner WWW site for latest releases and news.
Here's an example of a user-configured action-button for FileRunner, which will mostly interest XEmacs users (though it could probably be adapted easily for use with GNU Emacs). Create a file in the ~/.fr directory named cmds, then enter this text into it:
# This is an example of user-defined commands. This file should be named
# cmds and placed in your ~/.fr directory. It will then be read by
# FileRunner at startup.  Versions of FileRunner prior to 2.3 need to have
#the file named .fr_cmds and placed directly in the home directory.

# This list should contain all user-defined commands formatted as:
# { { <button-title> <procedure-name> } {..} {..} }
set config(usercommands) {
    { XEmacs xemacs }
 }
#
proc xemacs { filelist srcdir destdir } {
  cd $srcdir
#  set l {}
  foreach f $filelist {
  exec gnuclient -q $f
  }
}
For this to work, you must have gnuserv running; this can be started from your ~/.xemacs-options file by including the line
(gnuserv-start)
in the file. What this button does is send the files you've selected to an already-running XEmacs process (I usually have one running in a different virtual desktop than the one FileRunner is using). XEmacs will then open up a new frame in your current desktop with the file(s) displayed in it. This is handy for browsing source code.
In LG #14 I wrote about the minimalist window-manager wm2, written by British programmer Chris Cannam. Since then wm2 has spawned a variant, known as wmx. Evidently Mr. Cannam felt that spartan wm2 was becoming decadently featureful. Wm2 was stripped down to the bare minimum; no more frame-background pixmaps,etc. Wmx is just wm2 with the afore-mentioned pixmaps and a basic virtual-desktop utility. It has one more feature which I thought was very cleverly designed: if you click the middle mouse button on the desktop an application menu appears. Unlike most window-managers, the entries on the menu are a snap to set up. Simply create a subdirectory stemming from your home directory called .wmx and symlink executables to it. This can be even done while wmx is running. Whatever appears in ~/.wmx will appear in the menu. The menu can be configured with a transparent background so that it has a very stylish and spare appearance. As with wm2 the configuration can only be changed by recompiling, but this can be done very quickly as the source is not large or complex. Source for either wm2 or wmx can be obtained from the wm2 web-site.
A reader pointed out an error in my description of the Afterstep window-manager in LG #14. Rather than being based on Fvwm2 code, Afterstep is based on Fvwm version 1 code. Incidentally, pre-release 6 has been released and is well worth a trial. Several bugs have been fixed but the improved documentation alone makes it worth the download.
Lately it seems that a fad is sweeping the insular world of vi-like editors. First the X versions of Elvis and Vim appeared with pull-down menus; now it appears that Xvile will soon have a menubar as well. If a: you like vile/xvile and b: you have the Motif libs installed, you may want to take a look at the patches for vile 7.00 available from the Vile ftp site. The patches A through G need to be applied to the vile 7.0 source. It looks like the menu items will be fairly easy to set up, as they make use of the standard vile functions. An implementation for non-Motif X setups is planned.
I have mixed feelings about GUI conveniences such as menus in a vi editor. One of the appealing traits of these editors is the lack of such visible features combined with a wide array of invisible and powerful commands. Little overhead but great power and speed. If you have to reach for the mouse and select a menu-item, why not use Nedit (for example) which is designed as a mouse-oriented editor? On the other hand, how many users have had an unpleasant first-time experience with vi and rejected it forever? At least the menubar will have a "quit-ZZ" item, allowing a novice to end a first session without having to desperately flee to another virtual console and kill the vi process from afar!
The latest version of this versatile desktop/file manager can be found at the TkDesk home site. Version 1.0b4 has been released and many minor bugs have been fixed. There are three patches available on the web-site which should be applied by users of the program. Two of them are changes to *.tcl files, whereas the third is a c-source-level change which requires recompilation. Debian users can instead install a patched TkDesk package which is available from the /bo/binary-i386/x11 directory of ftp.debian.org and its mirrors.
For the past several months a beta development cycle has been underway in preparation for the release of mc-3.1.5. The recent releases (the latest as of this writing is patchlevel 25) have been very stable and usable. If you use the Midnight Commander frequently it might be worth your while to try the new version, as many improvements have been made.
An internal editor has been incorporated into mc, though you still can change the settings and use any console-mode external editor. The FTP capabilities of mc have been augmented and the Tk version has made great strides and needs just a few more features to be the equal of the classic console version. mc now has the ability to dive into *.rpm and *.deb files in the same manner it has been able to do with *.tgz and *.zip files, allowing you to inspect their contents without unpacking the archives.
It's only available in source form, but it comes with a good configure script and compiles easily here. The source is available from the mc home site.
Last month I wrote about the release of XEmacs 19.15. The XEmacs team didn't stop and rest on their laurels (probably because some unexpected problems showed up after the release!); beta releases of XEmacs 20.1 began showing up about twice a week at ftp.xemacs.org. It looked as if version 20.1 was about to be released, but for some reason the release was cancelled and they moved on to betas of 20.2. I'm running beta 2 now, and have found that several small problems with 19.15 have been fixed. The Customization utility works quite a bit better now, for one. When 20.2 is released I would recommend obtaining it, as it looks like it will be an improvement over 19.15. Another approach if you've already installed 19.15 is to visit the XEmacs patches page, which offers patches to upgrade 19.15 to patchlevel 2. The problems dealt with are described on the page; if the patches concern modes or utilities you never use, there's no point in applying them.
Welcome to the Slackware distribution of Linux! This chapter aims to help the new Linux user or administrator evaluate Slackware, plan a Slackware system, and install Slackware Linux. In it you'll find an emphasis on careful planning rather than rushing into an impetuous installation. A special worksheet is included to help you "get it right the first time", which I hope will be especially useful to overworked Unix administrators in busy environments.
Whether or not to choose Slackware as the flavor of Linux you will use is a serious consideration. It may seem like a trivial decision now, but Linux boxes have a way of taking on more and more responsibility in organizational computing environments. Plenty of Linux experiments have evolved in their first year to become mission-critical machines serving many more users and purposes than originally intended. Slackware is one of the most widely used distributions of Linux. When it comes to finding the newest, easiest, or most carefully planned distribution of Linux, Slackware may be "none of the above". Some background on the life and times of Slackware put things into perspective.
In 1993, SLS created one of the first organized distributions of Linux. Although it was a great start, the SLS distribution had many shortcomings (it didn't exactly work, for starters). Slackware, a godsend from Patrick Volkerding, solved most of these issues, was mirrored via FTP and pressed onto CD-ROMs the worldwide, and quickly became the most widely used flavor of Linux. For a while, Slackware was the only full-featured Linux solution. Other Linux distribution maintainers, both commercial and nonprofit, have gradually developed distributions that are also well worth your consideration.
According to statistics maintained by the Linux Counter Project, Slackware inhabits about 69% of all machines that run Linux. Slackware is typically obtained via FTP or CD-ROM and installed on a 486-class computer running at 66Mhz with about 16 MB of memory and 1050 MB of storage. More information about Linux use and the Linux Counter Project is available on the World Wide Web. http://domen.uninett.no/\~hta/linux/counter.html
By January 1994, Slackware had achieved such widespread use that it earned a popular notoriety normally reserved for rock stars and cult leaders. Gossip spread through the Usenet suggesting that the entire Slackware project was the work of witches and devil-worshippers! "Linux, the free OS....except for your SOUL! MOUHAHAHAHA!"
From:
Date: 7 Jan 1994 15:48:07 GMT
Jokes alluding to RFC 666, demonic daemons, and speculation that Pat Volkerding was actually L. Ron Hubbard in disguise were rampant in the threads that followed. The whole amusing incident probably helped Slackware gain some market share:
I LOVE THIS!!
I was browsing here to figure which version of Linux to install, but after this, I think that I hve no choice but to install Slackware now.
From:
Date: 10 Jan 1994 04:57:41 GMT
All folklore and kidding aside, Slackware is a wise and powerful choice for your adventures in Linux, whether you are a hobbyist, student, hacker, or system administrator in the making.
If you are a system administrator, you may already be dealing with one or more key servers running Slackware. Unless you have time to experiment at work, sticking to the tried-and-true distribution may be the easiest way to go. If you expect to get help from Unix literate friends and colleagues, better make sure they're running something compatible-odds are they're running Slackware. Its shortcomings are widely acknowledged, for the most part discovered, documented and patched whenever possible. You can put together a Slackware box, close the known security holes, and install some complementary tools from the other Linux distributions to create an excellent Unix server or desktop workstation, all in about half a day.
| Slackware is old | It's mature, widely available, and the most widely installed Linux distribution |
| Slackware lacks sexy administrative tools a la RedHat | You're free to add other distributions such as the RedHat package manager |
| Slackware includes bundled security holes | We know what some of the vulnerabilities are and volunteers have posted fixes |
| Donald Knuth complained about the fonts | Patrick Volkerding fixed the fonts |
| Linus Torvalds uses another distribution | Oh well |
| Slackware is assembled by Devil Worshippers | Satanist crackers (not SATAN itself) will avoid your box |
| Slackware is no longer | This is a myth, Slackware is developed actively maintained, sans marketing hype |
| Slackware is not supported by a commercial vendor or sanctionaed user group | Linux support is available along with consultants, explained further in the section on Commercial Support |
| Slackware is not created by a committee or development team | Good. A system designed by one accountable individual is cohesive |
If you are still undecided whether Slackware is the tastiest flavor of Linux for you, have a look at the "Buyer's Guide" published in the Linux Journal, which gives a thorough comparison and evaluation of each major distribution. For a straightforward listing of Linux flavors, have a look at the Linux Distribution HOWTO on the Internet:
http://sunsite.unc.edu/LDP/HOWTO/Distribution-HOWTO.html
Nine tenths of wisdom is timing. The right time to set up Slackware is afteryou've carefully planned the installation and alternatives in the unfortunate event of a problem. A well-planned installation of Slackware will repay itself many times over in the future, when the natural process of Linux evolution leads you to add disk space, install a newer Slackware release, or jettison any old, inferior operating systems that may linger on your drives.
Like Unix, Slackware Linux tends to grow like a virus. If you succeed in getting one Slackware box up and running, you're likely to start infecting other computers that belong to your friends, family, and coworkers. When this happens, you'll be grateful that you at least took the time to think through this first setup-and so will they!
This section will help you decide...
Linux is a powerful operating system, and with power comes responsibility. Like Linux, the Slackware release treats you with the respect you deserve as an intelligent human being. If you elect to wipe out a few hard drives with a misplaced punctuation mark, so be it. There are graceful and intelligent front-ends to Linux that allow the average end-user to get lots of productive work done without ever delving into the cryptic subtleties of Unix setup and administration. But there's no such luck for you, the appointed installation guru. If you're going to install Slackware, be forewarned that you should know your IRQs from your RS232s and your SCSIs from your IDEs.
This is an essential element for planning any Linux installation. The only Slackware-specific hardware issue is this: you must confirm that the particular version (vintage, release) distribution of Slackware you'll be installing from provides a kernel and drivers to support your hardware. You're in great shape with just about any IBM-compatible personal computer with an Intel CPU older than the date on your Slackware distribution but younger than 1992 (built after 1992). If you have a bleeding-edge machine, you may need to download a newer boot disk that includes an updated kernel and drivers.
For the latest information on it general Linux hardware compatibility, check the Linux Hardware Compatibility HOWTO document on the World Wide Web:
http://sunsite.unc.edu/LDP/HOWTO/Hardware-HOWTO.html
To check for up-to-the minute Slackware news, such as which boot kernels are available, you can look in this directory of the Slackware home ftp site, ftp.cdrom.com:
ftp://ftp.cdrom.com/pub/linux/slackware/patches/
Careful planning of file systems and the storage media upon which they reside can spare you hours of painful juggling at a later date. In particular, putting all of your custom administration files, user homes, and local software onto dedicated partitions or disks will allow you to upgrade Slackware on the root partition with minimal disruption to your improvements to the system.
A typical personal computer has one fixed disk drive. If you're a hobbyist or power user, you may already have installed more than one Operating System on that drive. For example, your computer may have shipped running MS-DOS or Windows 95 as a pre-loaded operating system, after which you added another operating system such as OS/2, NeXTstep, Geoworks, or Linux. To run multiple operating systems from one drive, the disk is divided into separate areas known as partitions. Each partition may contain a different operating system. Once you've installed a second OS, you also need to install a small program called a boot manager or OS loader that runs at system startup time and offers you a choice of all the installed operating systems.
If you're adding Linux to a computer running a lesser OS, you may elect to keep the old operating system around for kicks. Take a look at the Linux Loader (LILO), a high-powered boot manager that comes free with Slackware. The latest distribution of LILO and its documentation are available via FTP from this URL:
ftp://lrcftp.epfl.ch/pub/linus/local/lilo/
An overview of LILO and how you can use it are easily gleaned from the LILO Mini-HOWTO:
http://sunsite.unc.edu/LDP/HOWTO/mini/LILO/
In a simple world, you can set up Linux to run on a single disk partition (or maybe two-one for swap). In a real-world, multi-user Unix system, a single-drive file system setup creates unnecessary risks and hassles you can avoid by distributing the file system across multiple partitions. It's all the same to Unix, which views the file system as a continuum of available space comprised of all the disks and partitions "mounted" into various locations on the file tree.
If you create a Slackware setup on only one drive partition, you effectively put all of your eggs in one basket-one user may receive an abundance of e-mail and overload the /var/mail file system, another might store enormous files in their home area, etc. As with many Unix quandaries, you have a choice of solutions to control file system use, including quotas and user limits. Distributing your Unix file system across multiple partitions and disks has an extra benefit for Slackware users-it allows you to upgrade the Slackware installation with a minimum of pain.
The Linux file system standard puts the personal space of each user into a subdirectory of /home. The user Linus would typically have a home under /home/linus, the user Patricia under /home/patricia, and so on. An easy way to protect this file system during future upgrades is to mount /home on a separate disk or partition. Same goes for custom programs and resources you add to the off-the-shelf version of Slackware-plan to put these on a separate disk mounted to /usr/local and you'll have much less grief when it comes time to upgrade. "Where things go"---or where they try to go unless you dictate otherwise--- in a Slackware box is determined by a standard file system layout, called the Linux File system Hierarchy Standard. Read all about it URL:
http://www.pathname.com/fhs/
In some settings, Linux boxes are assembled from leftover parts-"worthless" 386 and 486 motherboards, old grayscale monitors, and discarded hard drives. You may need to link together several ancient 40MB hard drives to come up with enough space to install Slackware. In other environments using Linux, there are so many users and such large development projects that several of the biggest, state-of-the-art drives or drive arrays must be integrated to provide enough space.
You can install Slackware onto more than one disk at once by designating individual disks to hold specific parts of the Slackware installation (just like using multiple partitions), creating a logically continuous and unified file system.
For an informed second opinion on partitioning, swap space setup, fragmentation and inode size consult Kristian Koehntopp's Partitions Mini-HOWTO via Internet URL:
http://sunsite.unc.edu/mdw/HOWTO/mini/Partition/
24-Aug-95 NOTE: Trying to upgrade to ELF Slackware from a.out Slackware will undoubtedly cause you all kinds of problems. Don't do it.
Patrick Volkerding
One thing we don't hear too often with Slackware is the U-word. Slackware's setup program is designed to put a fresh operating system onto empty hard disks or empty disk partitions. Installing on top of a previous Slackware installation can erase your custom applications and cause compatibility problems between updated applications and older files on the same system. When Slackware was first put together, everyone was a first-time Linux user, and the system was always experimental-reinstalling the entire operating system and applications was the norm in a developmental system. Today, many institutions and businesses now run mission-critical applications on Slackware Linux. In such environment, a simple reboot is a planned activity and taking down the system and overwriting all the user files or custom applications is absolutely unacceptable.
So, if you cracked open these pages to plot an upgrade, better think twice. If you're planning a first-time Slackware installation, there are a few decisions you can make now that will ease upgrading in the future:
Teaching you how to finagle a Slackware upgrade is beyond the scope of this chapter, but it is workable if you are an experienced Unix administrator and you've taken the precautions above. There is an Internet resource that claims to analyze your distribution and bring it up to date across the Internet, you might want to have a look at this URL if you're facing an upgrade situation:
ftp://ftp.wsc.com/pub/freeware/linux/update.linux/
Or read, weep, and learn from the upgrade expertise of Greg Louis in his mini HOWTO document: Upgrading Your Linux Distribution, available where finer LDP publications are mirrored:
http://sunsite.unc.edu/LDP/
Slackware can be installed from a variety of media and network sources to fit your needs and budget. Every installation method will require you to have at least three floppy diskettes available to get started.
Installation from CD-ROM is fast, popular, and convenient. Although someone has to break down and pay for the initial purchase of a CD-ROM, sharing CD's is encouraged. Because Linux and the Slackware distribution are copylefted, you may make as many copies as you like. CD-ROM installation is also a bit better practice in terms of netiquette, since you're not hogging bandwidth for an all-day FTP transfer. Finally, you may be grateful for the extra utilities and documentation that accompany the CD-ROM, especially if you run into installation hassles or need to add components in the future.
If you're a hobbyist (or want to watch a few dozen Slackware installs before taking on the task at work), see if there is a LUG (Linux User Group) in your area that sponsors install parties. Imagine a roomful of generous and knowledgeable hackers uniting to share CD-ROMs and expertise with other enthusiasts.
FTP
According to the Linux Counter Project, FTP is still the most popular way to obtain Linux by a narrow margin. Once you transfer Slackware from the closest possible FTP mirror, you'll still need to put the Slackware 'disk sets' onto installation media such as a hard drive partition or laboriously copy them onto 50-odd floppy diskettes.
NFS
In a networked environment, it is possible to install Slackware on a shared file system and allow everyone on the Local net to attach to this shared location and install. If you have the technical know-how or a geeked out system administrator who is Linux-literate, this is a great way to go. The initial distribution of Slackware can be added to the network via CD-ROM, FTP, Loading floppies, tape, or even via a remote NFS share across the Internet! For details on such a remote share, see these URLs:
Floppy
It's time consuming, but it works-you can buy or create the pile of floppies needed to install Slackware and then feed them into your box one-by-one when prompted. Slackware 'disk sets' are actually designed and arranged to fit floppy diskettes. If you happen to have a huge stack of recycled high-density floppy diskettes at your disposal, this can be the most economical way to go.
Hard Disk
This is the way to do it if you've transferred the Slackware distribution across the Internet via FTP-you'll escape the floppy trap by merely creating boot, root, and rescue diskettes. It requires you to have an extra disk or disk partition with extra space to hold the Slackware files during installation (you can erase them afterwards). Installation from the hard drive is also a workaround if you bought the CD but your CD-ROM drive is not supported by any of the Linux kernels that come with the Slackware CD. You can use your present operating system to transfer the Slackware files onto spare hard disk space, then boot into the Slackware installation.
Tape
Still experimental as of this writing, tape offers a great compromise of speed and economy when installing Slackware-worth considering if a friend with compatible tape drive can dupe a CD or FTP archive for you. Get the latest details from the TAPE section of the INSTALL.TXT file that accompanies your Slackware distribution.
Even if you're gifted with a direct T-3 Internet connection that allows you to suck up a new distribution of Slackware right off the 'net, you'll be wise to start by building the two Slackware setup disks (boot and root) before proceeding. In the event of an unfortunate accident (power outage, feline friends traversing the keyboard, or even human error), these two little disks, in the hands of an experienced Unix hacker, may be able to revive your system or at least rescue your personal files.
During the installation, must choose which disk sets (Slackware lingo for collections of software) and individual programs to install. You can usually just accept the default recommendation of whether or not a package is worth having. A few setup decisions are crucial. Mid-installation is no time to decide you want to boot back into OS/2 and look up what kind of graphics chip your video card uses, which network card you've got in there, or whether you'll be needing a SCSI or an IDE kernel to get started.
I've often blurted out to a supervisor, "Oh sure, I can have it up and running in a few hours." Famous last words. If anyone else has a stake in the Slackware computer's health, you owe it to them and yourself to think through a less-than-perfect installation attempt:
After the files are all copied, Slackware can go on to do most of the system and network configuration, if you're ready. To help you plan your decisions, Section 3 consists of a worksheet derived from the text-based Slackware setup program. You can use this worksheet to record answers in advance (while your computer is still working!), so you'll be ready with the necessary details-partitions, IP addresses, modem and mouse IRQs, host and domain names, and others that you're required to provide during setup.
Last chance to back out! When using the install from scratch option, you must install to a blank partition. If you have not already formatted it manually, then you must format it when prompted. Enter I to install from scratch, or a to add software to your existing system.
Ext2fs defaults to one inode per 4096 bytes of drive space. If you're going to have many small files on your drive, you may need more inodes (one is used for each file entry). You can change the density to one inode per 2048 bytes, or even per 1024 bytes. Enter 2048 or 1024, or just hit Enter to accept the default of 4096. 4096, 2048, or 1024.
These are your Linux partitions (partition list displayed). These partitions are already in use (partition list displayed). Enter the partition you would like to use, or type q to quit adding new partitions. Use a format such as: /dev/hda3 or whatever the device name is. Partition name or quit
DOS and OS/2 Partition Setup: The following DOS FAT or OS/2 HPFS partitions were found: (partition list displayed).
Good! We're all set on the local end, but now we need to know where to find the software packages to install. First, we need the IP address of the machine where the Slackware sources are stored. Since you're already running on the network, you should be able to use the hostname instead of an IP address if you wish.
There must be a directory on the server with the Slackware sources for each disk in subdirectories beneath it. Setup needs to know the name of the directory on your server that contains the disk subdirectories. For example, if your A3 disk is found at /slackware/a3, then you would respond: /slackware.
These defaults are user definable---you may set any package to be added or skipped automatically by editing your choices into a file called TAGFILE that will be found on the first disk of each series. There will also be a copy of the original tagfile called TAGFILE.ORG available in case you want to restore the default settings. The tagfile contains all the instructions needed to completely automate your installation.
You can specify an extension consisting of a "." followed by any combination of 3 characters other than tgz. For instance, I specify '.pat', and then whenever any tagfiles called 'tagfile.pat' are found during the installation they are used instead of the default "tagfile" files. If the install program does not find tagfiles with the custom extension, it will use the default tagfiles. Enter your custom tagfile extension (including the leading ("."), or just press Enter to continue without a custom extension. Tagfile extension Enter
Now put a formatted floppy in your boot drive. This will be made into your Linux boot disk. Use this to boot Linux until LILO has been configured to boot from the hard drive. Any data on the target disk will be destroyed. Insert the disk and press Return, or s if you want to skip this step.
Now, we need the domain name. Do not supply a leading "." Enter the domain name. Domain name
If you only plan to use TCP/IP through loopback, then your IP address will be 127.0.0.1 and we can skip a lot of the following questions. Do you plan to ONLY use loopback? Yes or No.
Enter your IP address for the local machine. Example: 111.112.113.114. Enter the IP address for this machine (aaa.bbb.ccc.ddd). IP address
You may now reboot your computer by pressing Ctrl+Alt+Delete. If you installed LILO, remove the boot disk from your computer before rebooting. Don't forget to create you {/etc/fsta if you don't have one!
If you've taken the time to plot and plan as recommended in the preceding sections, then the actual installation will be a piece of cake. There isn't much writing needed to explain the actual process of loading Slackware onto your computer(s). You just follow the steps to build boot and root diskettes, then answer a long series of questions asked by the menu-driven Slackware installation program. If you've completed the Slackware Installation Worksheet, these questions will be familiar and everything will run smoothly.
Choose Your Kernel
When installing Slackware Linux, you must create a boot diskette with a Linux kernel that is specially prepared to recognize your system hardware. For example, to install Slackware from an IDE CD-ROM drive onto a SCSI hard drive, the kernel that you put onto the boot diskette will need to have drivers for your SCSI card and your IDE CD-ROM drive.
The kernels are stored as compressed binary image files that you can access from most any operating system to create a Slackware Boot diskette. On the Slackware FTP site, CD-ROM, or NFS mount, you'll find a subdirectory called bootdsks.144-containing 1.44 MB kernel images for creating boot disks on 1.44MB high density 3.5'' floppy diskettes. If you're working from a 5.25'' floppy diskette drive, look in a directory called bootdsks.12 for kernel images that will fit the smaller diskette format.
Table 2 provides a quick reference of the kernel images available as we went to press. Information and up-to-date boot disk image information is available from this URL: ftp://ftp.cdrom.com/pub/linux/slackware/bootdsks.144/README.TXT
Table 1
| aztech.i | CD-ROM drives: Aztech CDA268-01A, Orchid CD-3110, Okano/Wearnes, CDD110, Conrad TXC, CyCDROM CR520, CR540 |
| bare.i | (none, just IDE support) |
| cdu31a.i | Sony CDU31/33a CD-ROM |
| cdu535.i | Sony CDU531/535 CD-ROM |
| cm206.i | Philips/LMS cm206 CD-ROM with cm260 adapter card |
| goldstar.i | Goldstar R420 CD-ROM (sometimes sold in a Reveal "Multimedia Kit") |
| mcd.i | NON-IDE Mitsumi CD-ROM support |
| mcdx.i | Improved NON-IDE Mitsumi CD-ROM support |
| net.i | Ethernet support |
| optics.i | Optics Storage 8000 AT CD-ROM (the "DOLPHIN" drive) |
| sanyo.i | Sanyo CDR-H94A CD-ROM support |
| sbpcd.i | Matsushita, Kotobuki, Panasonic, CreativeLabs (Sound Blaster), Longshine and Teac NON-IDE CD-ROM support |
| xt.i | MFM hard drive support |
Table 2
| 7000fast.s | Western Digital 7000FASST SCSI support |
| Advansys.s | AdvanSys SCSI support |
| Aha152x.s | Adaptec 152x SCSI support |
| Adaptec 1542 SCSI support |
|
| Aha1740.s | Adaptec 1740 SCSI support |
| Aha2x4x.s | Adaptec AIC7xxx SCSI support (For these cards: AHA-274x, AHA-2842, & AHA-2940, AHA-2940W, AHA-2940U, AHA-2940UW, AHA-2944D, AHA-2944WD, & AHA-3940, AHA-3940W, AHA-3985, AHA-3985W) |
| Am53c974.s | AMD AM53/79C974 SCSI support |
| Aztech.s | All supported SCSI controllers, plus CD-ROM support for Aztech CDA268-01A, Orchid CD-3110, Okano/Wearnes CDD110, Conrad TXC, CyCDROM CR520, CR540 |
| Buslogic.s | Buslogic MultiMaster SCSI support |
| Cdu31a.s | All supported SCSI controllers, plus CD-ROM support for Sony CDU31/33a |
| Cdu535.s | All supported SCSI controllers, plus CD-ROM support for Sony CDU531/535 |
| Cm206.s | All supported SCSI controllers, plus Philips/LMS cm206 CD-ROM with cm260 adapter card |
| Dtc3280.s | DTC (Data Technology Corp) 3180/3280 SCSI support |
| Eata\_dma.s | DPT EATA-DMA SCSI support (Boards such as PM2011, PM2021, PM2041, & PM3021, PM2012B, PM2022, PM2122, PM2322, PM2042, PM3122, PM3222, & PM3332, PM2024, PM2124, PM2044, PM2144, PM3224, PM3334.) |
| Eata\_isa.s | DPT EATA-ISA/EISA SCSI support (Boards such as PM2011B/9X, & PM2021A/9X, PM2012A, PM2012B, PM2022A/9X, PM2122A/9X, PM2322A/9X) |
| Eata\_pio.s | DPT EATA-PIO SCSI support (PM2001 and PM2012A) |
| Fdomain.s | Future Domain TMC-16x0 SCSI support |
| Goldstar.s | All supported SCSI controllers, plus Goldstar R420 CD-ROM (sometimes sold in a Reveal "Multimedia Kit") |
| In2000.s | Always IN2000 SCSI support |
Table 3
| Iomega.s | IOMEGA PPA3 parallel port SCSI support (also supports the parallel port version of the ZIP drive) |
|
| Mcd.s | All supported SCSI controllers, plusstandard non-IDE Mitsumi CD-ROM support |
|
| Mcdx.s | All supported SCSI controllers, plus enhanced non-IDE Mitsumi CD-ROM support |
|
| N53c406a.s | NCR 53c406a SCSI support |
|
| N\_5380.s | NCR 5380 and 53c400 SCSI support |
|
| N\_53c7xx.s | NCR 53c7xx, 53c8xx SCSI support (Most NCR PCI SCSI controllers use this driver) |
|
| Optics.s | All supported SCSI controllers, plus support for the Optics Storage 8000 AT CDROM (the "DOLPHIN" drive) |
|
| Pas16.s | Pro Audio Spectrum/Studio 16 SCSI support |
|
| Qlog\_fas.s | ISA/VLB/PCMCIA Qlogic FastSCSI! support (also supports the Control Concepts SCSI cards based on the Qlogic FASXXX chip) |
|
| Qlog\_isp.s | Supports all Qlogic PCI SCSI controllers, except the PCI-basic, which the AMD SCSI driver supports |
|
| Sanyo.s | All supported SCSI controllers, plus Sanyo CDR-H94A CD-ROM support |
|
| Sbpcd.s | All supported SCSI controllers, plus Matsushita, Kotobuki, Panasonic, CreativeLabs (Sound Blaster), Longshine and Teac NON-IDE CDROM support |
|
| Scsinet.s | All supported SCSI controllers, plus full ethernet support |
|
| Seagate.s | Seagate ST01/ST02, Future Domain TMC-885/950 SCSI support |
|
| Trantor.s | Trantor T128/T128F/T228 SCSI support |
|
| Ultrastr.s | UltraStor 14F, 24F, and 34F SCSI support |
|
| Ustor14f.s | UltraStor 14F and 34F SCSI support |
Unix Operating Systems
If you have the Slackware kernel images on a Unix host that has a floppy drive, you can quickly create the necessary boot and root diskettes using Unix commands. You can use the dd command. The example below which puts the scsi.s boot kernel image onto the floppy device rfd0: dd if=scsi.s of=/dev/rfd0 obs=18k
You'll need to repeat this process with one of the root disk images onto a second floppy diskette.
DOS, OS/2, MS-Windows 95 \& NT
Slackware bundles a utility called rawrite.exe that will generate boot and root diskettes under DOS-literate operating systems. To write the scsi.s kernel image onto the formatted, high-density diskette in your A:$\backslash$ diskette drive, issue the following command: RAWRITE SCSI.S A:
You'll need to repeat this process with one of the root disk images onto a second floppy diskette.
Here's the big anticlimax. After all this planning, preparation, and partitioning, you're in the home stretch. Make sure the boot floppy is in the diskette drive, and restart your computer. Now is a good time to go get some coffee (or whatever you like to keep you company) and return to the machine ready to play the part of a button-pushing drone, answering yes-no questions for an hour or so.
Log in as root (no password) and type setup or setup.tty
Slackware comes with two versions of an excellent setup program. One is a colorful, dialog-based, menu-driven version. An alternative setup, setup.tty, is a text-only version of the installation that you may actually prefer, because detailed diagnostics and error messages will stay on the screen and not be erased by the next dialog box, which happens in the color version. If you're attempting a Slackware setup on sketchy hardware, I strongly recommend the less colorful setup.tty routine. If you don't know much about Unix and would feel more comfortable with an attractive. ``clean'' interface to the same setup process, then by all means go for the beautiful setup.
Hint: If you have trouble using the arrow keys on your keyboard, you can use '+', '-', and TAB instead. Which option would you like?
To transfer Slackware onto your system from here should involve little more than selecting what you want off the menus. By filling out the Section 3 worksheet in advance, you should be able progress quickly through each menu in order, until you reach the INSTALL option, at which point things may s l o w down: you are advised to select the PROMPT feature and read about each software package, deciding whether or not you'd like it to end up on your Slackware system. The last part of a regular setup is the CONFIGURE section on the setup menu, and the questions you must answer bear a striking resemblance to the second half of the Section 3 worksheet.
Definitely not! At this point, you've either got some annoying obstacle that is preventing the setup from completing, or more likely, you're looking at the root prompt darkstar\~\#
and wondering "What Next?"
Well, if you're plagued by problems, you'll want to proceed directly to the next section on troubleshooting. If things appear to be in working order, you've still got some details to attend to. Sort of like purchasing a new automobile-after you've selected an paid for a new car, there are still some things you need before you can drive it with confidence-insurance, a steering wheel club, and perhaps some luxuries that make the driving experience closer to Fahrvergn\ügen than FAQ!
Not every Slackware installation is born on cue to expecting system administrators. I've pulled a few all nighters, sitting down after work one evening to upgrade a Slackware box and still there struggling to get the damn thing back online at dawn, before people start bitching about their missing mail and news. This section will look at a few common Slackware setup problems, solutions, and where to look for additional assistance.
Patrick Volkerding, the father of Slackware, has dealt with the many questions of new users by listening, answering, and anticipating repeat queries. To catch the new Slackware users before they ask the same question for the 5,000th time, Patrick has kindly created documentation and included it with the Slackware distribution. Three files that you may find very helpful in answering your initial questions are FAQ.TXT, INSTALL.TXT, and BOOTING.TXT.
Web Support For Slackware
At this time, the Slackware-specific help you'll find on the Internet tends to be highly customized---such as how to NFS-mount the distribution on computers within a certain university or how to wire your dorm room into a particular residential WAN using Slackware.
Usenet Groups For Slackware
The comp.os.linux.* hierarchy of the Usenet is a treasure-trove of Linux information, not necessarily Slackware-specific. At present, 11 separate Linux forums handle a high volume of discussion in this hierarchy. Dozens of other general-Unix newsgroups are also available. Some discussions relevant to getting Slackware up and running are:
A group established for figuring out Linux installation and system administration. The best place to look for clever setup strategies and to network with others who may have recently installed Slackware.
A must-read for Linux administrators and enthusiasts, C.o.l.a is a sort of daily Linux digest for the Internet community. The group is moderated, so only the relevant material makes it into circulation. The newsgroup is designed as a low-traffic alert service for announcing Linux-specific software, documentation, and security warnings.
Here's where to find (or post) the latest Linux FAQs, How-Tos, READMEs and other documents that answer questions about Linux.
Mail Lists For Slackware
At this time, there are no electronic mail discussions devoted to Slackware per-se. You can participate in some excellent Linux-related talk via e-mail, try www.linux.org and asking in the newsgroups for a few good subscription lists.
Commercial support for Linux is available from some of the CD-ROM vendors and a long list of Linux Consultants, who can be contacted through the Linux Commercial and Consultants HOWTO documents: http://sunsite.unc.edu/LDP/HOWTO/Consultatns-HOWTO.html
http://sunsite.unc.edu/LDP/HOWTO/Commercial-HOWTO.html
Don't rest on your laurels quite yet. Especially if your Slackware machine is a shared computer or lives in a networked environment. Grooming a computer for community and network use is a bit more demanding than just running the setup program and forgetting about it. We'll leave you with a few pointers to securing and sharing your new Slackware system.
I know you just sat through what may have been a long and perplexing installation session. But before you move into the house you just built, consider tearing it down and starting over again. Friedrich Nietzsche had a quote: "A man learns what he needs to know about building his house only after he's finished."
If, in the process of installing the system, you had some thoughts about how you might do it differently, now is the time. If your Slackware Linux box will be a multi user machine or a network server, there may never be such a convenient opportunity to reinstall or reconfigure the system in radical ways.
Before you put away the CDROM or return the 50 floppy disks you borrowed to run the Slackware installation, sit down and test each application that your users may expect to find in working order. If professor Bien absolutely has to have emacs humming under X-Windows, you'd better test it out now, while you've still got the workstation 'in the shop.'
Did you set up this Linux box to serve a specific purpose in your organization, such as...
Get Off The LAN At Once
Out of the box, Slackware is an insecure system. Although Patrick does his best to create a secure distribution, a few inevitable holes become known, and patches or workarounds are made available in the system administration (and cracker) communities. If you installed Slackware from a network source such as an NFS-mounted drive, you should temporarily disconnect your box from the LAN after a successful installation, while you plug a few holes.
Give Root a Password
By default, a new Slackware box will not require a password for the root user. When you're comfortable that your new Slackware system is stable (after a few hours, not days or weeks), add a password to protect the root account. Login as root and type: passwd root
Give Yourself An Account
On large shared systems, the super-user root account is not used as a working login account by any individual. If you're interested in system administration or are running a networked machine, this is a good precedent to follow. Use the \texttt{/sbin/adduser} program to make yourself a login account, rather than working out of the root login. I always smile when I see students and hobbyists posting proudly to the Usenet as root@mymachine.mydomain. Be humble and safe, create another login account for your daily work and use su (rather than login) to enter the root account sparingly.
Deny Root Logins
Not only is it uncommon to work as the root user, it is not considered secure to login as root across the network. Administrative users usually connect to a Unix box as their regular username login, and then use the su utility to become the root user as needed. To prevent crackers, hackers, and ignorant users from logging in directly as root, edit the file /etc/securetty and comment out (prepend a pound \# sign before) all but the local terminals: console tty1 tty2 \# ttyS0 \# ttyS1
After this fix, users who attempt to login in as root across the network will be denied: Linux 2.0.29 (durak.interactivate.com)
durak login: root
root login refused on this terminal.
durak login:
Apply the Simple Fixes
Slackware installs itself with some very real security problems. Rather than master Unix security and sleuth out these vulnerabilities yourself, you can jump start the hole-patching process by visiting a web resource maintained for just this purpose, called Slackware SimpleFixes: http://cesdis.gsfc.nasa.gov/linux-web/simplefixes/simplefixes.html
Check For Patches On ftp.cdrom.com
As an actively maintained Linux distribution Slackware updates and patches are available from: ftp://ftp.cdrom.com/pub/linux/slackware/patches/
Stay Current
You might like to subscribe to one or more electronic mail lists that alert users to issues in Linux administration, such as:
Like how things are running? Save it for a rainy day by backing up. Amanda (The Advanced Maryland Automatic Network Disk Archiver) is one of several backup options for Linux installations. You can learn more about Amanda from: http://www.cs.umd.edu/projects/amanda/index.html/
It all started with a simple question: `Why don't we install Linux at all our meetings instead of at only some of them?' The North Texas Linux Users Group had been in existence for only about five months, and we wanted to make sure to spread the word in North Texas about Linux. We wanted to educate the computing public in our area about Linux, but we also wanted to let experienced computer users know that Linux could handle anything they threw at it.
After meeting at Texas Christian University for our first few meetings, we signed a contract with the DFWXchange that enabled NTLUG to meet at the Dallas Infomart. The DFWXchange is an umbrella organization that allows Dallas-Fort Worth users groups to meet at the Infomart for free, with all costs being absorbed by the many commercial vendors who also meet at the Infomart during the Super Satuday Sale. So every month between 3,000 and 5,000 computer users from the Dallas-Fort Worth Metroplex converge on the Infomart---the premier meeting facility in the Southwest devoted exclusively to computer and technology events and organziations---to participate in users groups meetings and to take advantage of some really good prices on computer-related hardware. It's a big party.
It didn't take long for the NTLUG leadership to realize that we had stumbled upon a great opportunity: we wanted to let computer users in our area know about Linux, and we were now meeting every month in a facility filled with thousands of potential Linux converts. Our solution was to start the Linux Installation Project, which we call the LIP.
The goal of LIP is simply to install Linux on as many computers as possible. Those of us who participate in this project month-to-month have discovered that the very best way to advocate the use of Linux is to make it easy and painless for the unconverted to do just that: namely, run Linux on their computer of choice. In other words, Linux is its own best advocate. After a few weeks without a crash, most people say goodbye to Windows 95 with zealous enthusiasm. We like to think of LIP as an ongoing Linux Installation Festival that allows us to convert computer users to Linux one at a time.
The first step in establishing LIP as a well-run, consistent endeavor was to find someone to lead the effort. NTLUG is fortunate to have a technologically advanced membership, and it was fairly easy to find someone to lead the LIP; in fact, we found two such people: Mike Dunn and Bill Petersen, both of whom are experienced Unix and Linux Sysadmins. Under their guidance, and due to the generosity of NTLUG members, NTLUG's LIP has solicited and organized enough computer hardware to perform up to many simultaneous installations of Linux by all the usual methods, although we've found that cdrom installations are usually the most trouble free.
The word has now spread in and around the Dallas-Fort Worth Metroplex---from schools and universities to computer vendors and other users groups---that NTLUG's LIP is the place to go for a painless installation of Linux onto PCs, laptops, servers, and even Alpha platforms. We have expanded our efforts at the LIP booth to include Linux advocacy, advertisement for Linux vendors who supply us with materials, the sale of Linux CDs (thanks to Bradley Glonka at Linux Systems Labs), and even basic Linux system administration and maintenance. We also spend a lot of time explaining to the uninitiated masses what makes Linux free and what makes it so much fun.
While we have been happy with the results so far, the LIP has more work to do. We want to expand our sales efforts to include other kinds of Linux merchandise (the sales of which go to support NTLUG and LIP), and we'd also like to expand our hardware assets to enable more simultaneous installations. Finally, we also want to develop our users group assets to such an extent that we can go to other DFW-area computer events and setup Linux installation and advocacy booths. NTLUG's approach to the Linux Installation Project can be summed up in the phrase: "Linux is free. Life is good."
If you want to learn more about the North Texas Linux Users Group or our Linux Installation Project, or if you're a Linux Users Group and would like to talk about setting up your own local version of LIP, please visit the NTLUG website or contact me at .
Finally, I would be guilty of ingratitude if I did not thank the following people and organizations that have made the LIP possible. Please forgive me if I've forgotten anyone. It's just about impossible not to meet great people when you work with Linux.

 Larry AyersKendall G. ClarkJim DennisSean DreilingerJon "maddog" HallMichael J. HammelRick HohenseeMike ListJesper PedersenJay Painter
Thanks to all our authors, not just the ones above, but also those who wrote giving us their tips and tricks and making suggestions. Thanks also to our new mirror sites. And many, many thanks to Amy for doing most of the work this month.
 Seattle--always a wonderful event. Riley and I spent the morning working in the yard, clearing out a flower bed that was overgrown with grass. It felt like hard physical labor after sitting at a desk all week. We rewarded ourselves by taking a spin on the motorcycle along the Sound. Even as passenger there is something about riding on a motorcycle that puts a smile on my face. I guess it helps that I have complete trust in Riley's driving abilities.
Afterward I went to the Opera House for a talk about Il Trovatore by Giuseppe Verdi (or Joe Green, as Riley likes to call him). I had seen the opera itself on Wednesday night--a silly story as usual but, oh, such wonderful music! I think it has to be one of my favorites. At any rate the talk was informative and fun and made a nice end to a very wonderful day.
Have fun!
Marjorie L. Richardson
Editor, Linux Gazette
Linux Gazette Issue 17, May 1997, http://www.ssc.com/lg/
This page written and maintained by the Editor of Linux Gazette,


 The Mailbag!